6 No Fuss Activities to Share with Your Sitter

There’s no need to resort to leaving the babysitter new toys or typically forbidden treats to feed your kids to ensure they are happy while you’re away. Instead, why not give your sitter a few no fuss, low mess activities she can do together with your kids. These fun activities are entertaining and take very little effort for you to pull together.

isabel-babypainting

6 No Fuss Activities to Share with Your Sitter

1. Paint with Water
Painting with water works anywhere – on a chalkboard, sidewalk, or even on the floor. It’s fun, requires nothing more than a paintbrush and cup of water and can be cleaned up with a bath towel in no time at all.

via Artful Parent
via Artful Parent

2. Build Your Own Cupcake
This cupcake craft is guaranteed to provide hours of fun for your preschooler and her sitter. Simply leave them the printable cupcakes and interchangeable cakes, toppings and papers and let them cut out the pieces and mix and match to build their own cupcakes. The project might inspire a tea party or maybe another cupcake project, such as decorating store-bought cupcakes or baking a homemade batch.

Screen Shot 2014-03-28 at 9.41.40 AM
via Creature Comforts

3. Create a Fairy House
If you have an imaginative child who likes to be outside and a creative babysitter, this is a fun afternoon activity. Encourage your child and his sitter to use their imaginations and whatever they can find inside and out to create a mini fairy house in a pot or directly in the garden.

via Flickr Daisies la la land


4. Tie Dye Easter Eggs
Dying eggs is super easy with this ingenious method – simply leave a dozen eggs (boiled ahead of time if you find the time), vinegar and food coloring. Have your sitter set your child up with a colander and a shallow pan or bowl, place an egg in the colander and splash with a bit of white vinegar. Add a drop or two of food coloring and then another color and have your child swirl the egg around to distribute the colors, essentially “tie dying” the eggs. Let the eggs sit for a few minutes to set and then rinse briefly in cool water. Makes for a cool project and a healthy snack, too!

Screen Shot 2014-03-28 at 9.48.45 AM
via Pink and Green Mama

5. Bake a Chocolate Chip Cookie Cake
Simply leave your (very responsible and safety minded) sitter with a boxed cake mix, bag of chocolate chips, cooking oil and three eggs, along with this handy recipe. In very little time and with minimal effort, she and the kids can whip up this really yummy chocolate chip cookie cake.

via Budget Savvy Diva

6. Collaborate on a Masterpiece
Working side by side with a child, as equals, makes a project extra special. Rather than setting your child up with art supplies and a canvas and leaving her to work on her own while you take care of other responsibilities, make her day by grabbing the seat next to her and announcing that you are doing a partner project. Your sitter makes a fine art partner for her, too, and will be glad to spend time collaborately with your child on their own artistic masterpiece. You can use what you have on hand – paper or a canvas and paints of any kind – or make a special trip to the art supply store to pick and choose supplies for this special painting project.

via Playful Learning


Your sitter will appreciate your thoughtfulness in planning these fun projects, your little one will have a fantastic time while your away. Do you have a few easy, entertaining projects up your sleeve? We’ve love to hear about them!

5 Ways to Celebrate the Olympics with Your Family

The 2014 Olympic Winter Games kick off Friday, February 7 in Sochi, Russia. Don’t miss out on the chance to get your kids engaged and excited about a spectacular, inspiring event that happens just once every four years. Even little kids will enjoy these fun activities designed for celebrating the Olympics, family style.

IMAG0296

5 Ways to Celebrate the Olympics with Your Family

1. Host an Opening Ceremony Celebration

The Opening Ceremonies are one of the most exciting moments of the Olympic games. You can get your kids excited by throwing a family party, complete with Opening Ceremony decorations, menu and their own awesome, DIY torch. The ingenious blogger at Living Well Spending Less outlines an impressive, yet relatively simple bash for kids that includes a patriotic dessert, edible torches and cute decorations. To brandish your kids with impressive torches you can create together, check out the Tea Light Olympic Torches by Oh My Creative. They’ll love holding their own glowing torches as they watch the ceremonies.

Glowing Olympic Torch via Oh My Creative
via Oh My Creative

2. Hit the Ice Rink or the “Slopes”

Channel your child’s inner athlete and help him away from the TV and into the action by taking your family to an indoor and outdoor ice skating rink. Rinks across the country will be heating up once the winter game’s skating and the hockey games begin. The SF Bay Area’s Yerba Buena Skate Bowl, Chicago’s Mcfetridge Sports Center and the Top of the Rock or Sky Rink Chelsea Piers in NYC  are top spots for hitting the ice, or find a location near you for a fun afternoon together.

If you’re lucky enough to live near a ski resort (and the weather is cooperating!), take advantage of the loads of Kids Ski Free deals out there or sign your kids up for ski or snowboarding school. If you don’t live near the slopes, create your own – at the beach, in your backyard or local park, or try a little cross country skiing in your living room!
julia-Toddler making snow angels

3. Gear Up and Get Crafty

The games are even more fun for kids to watch if they have their own score cards, metals and super cool athletic headbands. Help them gear up by arming your sitter with craft materials and handy instructions for Olympic-style crafts from Spoonful.

Olympic Crafts via Spoonful
via Spoonful

4. Introduce and Celebrate Russian Culture

The Olympics provide your kids with a chance to see real-life heroes (nearly 7,000 athletes from 85 countries are competing!) and proof that anything is possible with hard work and dedication. They are also an ideal opportunity to give your children a lesson in geography and a chance for them to explore a new culture. The hosting country, Russia, is a logical place to start. Dive in by exploring the country’s traditional architecture, art and crafts, food, and traditions with these fun, kid-friendly activities:

  • Explore Russian architecture by turning the wonderfully eye-catching, colorful domes and spheres on Orthodox Russian churches into inspiration for a fun art project. Kids will enjoy arranging the shapes like blocks on paper and embellishing to make their own creations.

    Russian Domes and Spheres Project via Having Fun at Home
    via Having Fun at Home
  • Load your iTunes account with music from some of the world’s most famous composers – Tchaikovsky, Rachmaninov,  and Stravinsky – and introduce your kids to music that may be brand new to them.
  • Create your own Russian dolls with this free, printable Russian Doll template from Activity Village.
  • Throw your own Russian Tea Party with Russian Tea Cakes you can bake with your children.

5. Go for the Gold in Your Own Mini Olympics

No kid will turn down the chance to be the star of his own games. Recreate the excitement with Backyard Olympic games, like these from Hoosier Homemade, which include a bean bag toss that works indoors or out. You can also create a snowball fight (with real snow or the DIY kind made from sheets of balled up paper), a sled race or living room ice skating.

Don’t forget the medals – gold, silver and bronze for bigger kids, and a single “everyone is a winner” gold for the little ones. Check Pinterest for loads of DIY ideas.

Backyard Olympic Games via Hoosier Homemade
via Hoosier Homemade

What’s your favorite way to celebrate the Olympics? Let us know in the comments below!

Browse and book gold medal babysitters and nannies at www.urbansitter.com.

Perfect DIY Holiday Gifts for Kids to Give

molli-xmas copyTeach kids the joy of giving by helping them to choose or create thoughtful, personal DIY gifts for best buddies and loved ones in their lives.

They won’t have to save years of allowance and birthday money or toil away hours of their after-school time crafting to give these sweet gifts that capture the real meaning of the holiday season.

For more DIY holiday gift ideas, visit our Pinterest holiday board!

7 Handmade Holiday Gifts Ideas

Thumbprint String of Lights Canvas

An endearing gift of tiny thumbprints turned into a string of holiday lights make a lovely, homemade card—though they are certainly worthy of a frame—and simple enough for the tiniest of thumbs.

via Beneath the Rowan Tree

Photobook of Artwork

You know that pile of your child’s precious artwork that seems to multiply exponentially every time he empties his school bag? You may be able to whittle it down without guilt by creating a fantastic photo book of the one-of-a-kind masterpieces. Help your child pick favorites he created throughout the year and quickly and easily compile them into a Mixbook photo book worthy of coffee table space.

via Mixbook
via Mixbook


Cinnamon Applesauce Heart Ornaments

Grab a whole lot of cinnamon, some applesauce, ground cloves, a heart cookie cutter, string and a pair of little hands who are ready to dive in and do some kneading.  These adorable creations are fun to make, will have your home smelling divine, and will provide festive fragrance to their recipient’s tree for years to come. Remember–as good as they look and smell, they are not edible!

via Katy Elliot
via Katy Elliot

Personalized Coffee Mug

If you want to make a quick and easy gift that’s also heartfelt, check out these mugs personalized with a porcelain marker. The instructions provided by Crafts Tuts Plus show you how to transfer ready-made designs or create your own. They also provide free, printable templates for creating adorable monster images, but you can obviously create your own. Just remember that any design transferred with this technique will be mirrored, so you may want to have your little artist stick with pictures instead of text.

via Crafts Tuts Plus


Canvas Silhouette Paintings

Full disclosure – this isn’t one for the kids to create, but it sure is sweet for them to give to an adoring grandparent or special loved one. The DIY is on you, but it’s fairly simple. You’ll need a canvas, acrylic paints, foam brush or roller, and a vinyl sheet. Essentially, you will take a photo of your child’s profile, print it on regular paper and then on the vinyl sheet, which will stick to the canvas. Once secured, you can paint the area around the silhouette and cleanly peel over the vinyl. Eye-popping and personal without being too traditional.

Silhouettes by Honest to Nod


Giving to Those Who Need it the Most

Give the gift of changing the world. Kids can either choose to give to a cause in need or send a gift card that allows someone else to support a cause near and dear to their own heart. GlobalGiving Gift Cards allows the recipient to choose a project that they would like to support – choosing by location or theme, for example – and watch how the money is put to work through regular updates from the field. Causes include many that are relatable even to young children. What better gift than to show children that each of us can make a difference?

via GlobalGiving
via GlobalGiving

If you’re hoping one of these heart-warming gifts ends up with your name on it, leave some craft supplies and instructions for the sitter to tackle with your kids.

UrbanSitter.com has plenty of babysitters ready and willing to jump on some DIY time with the kids!

Last Minute Tips for Creating a Fantastic Kids’ Table for Thanksgiving

The secret to keeping kids entertained and avoiding mid-meal meltdowns at this year’s Thanksgiving table is to give them one heck of a kids’ table. No blood, sweat or tears required to pull off some of these cool ideas. We’ve deemed them this week’s Five Favorite Pins for Parents. For more helpful ideas, check out our Pinterest Board – Kids’ Table.

5 Kids’ Table Ideas for Thanksgiving

1. Channel your favorite kid-friendly restaurant and leave fun coloring pages for place mats. These free printables are especially useful, since they are chock full of turkey day-themed activities.

via My Sister's Suitcase
via My Sister’s Suitcase

2. A simple Thanksgiving craft for kids can be even simpler if you pre-cut the necessary pieces and leave them on the table with a few glue sticks and washable markers. Create one of these gobblers as a sample and let the older kids guide the younger ones.

via Meet the Dubiens

3. A miniature Mayflower makes a wow-worthy centerpiece. This homemade one also serves as a vessel for holding words of thanks to be shared before the meal. If you’re so inclined to go a little Martha Stewart on your kids’ table, let it set sail on a map tablecloth, and include paper-boat place cards to steer your young pilgrams to their seats.

Mayflower Centerpiece Image via Pinterest

4. Reserve some fresh veggies from your chopping board, and toss them into cute turkey cups. A little dip at the bottom makes them attention-grabbing snacks kids can munch while you make the meal.

via Me and My Insanity

5. Save your linens and keep the kids contained by decking their table in craft paper and leaving plenty of crayons to encourage them to make it their own.

via Decorating Files

Find & book trusted babysitters online at UrbanSitter.

5 Rainy Day Activities

You’ve seen a million lists like this one, but it never hurts to have some fresh ideas. When you’re stuck in the house and the natives are restless, give one of these a shot.

5 Rainy Day Activities

rainyday

1. Tupperware bowling. Line up your BPA-free lunch containers in the kitchen or hallway and give any type of ball a roll. See how many you can knock down. Kids love anything involving destruction and they can even help set up the “pins.” You can make a more challenging formation for older kids and keep track of spares and strikes, just like in a real game. No grimy shoes required.

2. A bath. Who doesn’t love a warm bubble bath on a cold day? With babies or toddlers, don’t be afraid to climb in with them – and let your little one choose a toy or two to submerge. Most plastic toys do just fine in water and some might need a bath anyway. Race tracks are particularly fun in water as are play kitchen utensils, pots and pans. With older kids, you may even get to read a magazine while sitting on the toilet seat.

Baby in bathtub

3. Baking. Anything is fun when kids get to “help.” Don’t make it a dish you need to present at a fancy dinner party. Search your pantry for something easy and kid-friendly. Banana bread, cookies with M&M’s, even lasagna for dinner (as long as little hands are nimble and super clean) are great options. Older children can help read measurements and set the oven timer. Little ones can pour and stir. Baking is a great hands-on activity and is sure to please when the timer dings.

4. This Is Your Life, starring your child(ren). Kids love to look at photos and videos from when they were babies. If you don’t have a baby book, start with any loose photos in a drawer, digital files, ultrasound pics, the invitation to your baby shower, and any videos Dad made — first steps, first words, first bike ride. Oldest children will benefit most (why do we run out of photographic energy with each respective child?!), but even the youngest ones will delight in seeing you pregnant (“I was in your tummy!”) and if you’re lucky, he or she can help you organize and perhaps even create a photo album or online photo book.

5. Magazine arts and crafts. Find some old magazines, catalogs, or newspaper advertisement inserts — maybe even an old book or two — and let them go to town with scissors and glue. Cutting and pasting pictures onto construction paper is fun for everyone. A holiday or birthday list is always enhanced by photos of coveted items, and creating a “book” can be fun, too, complete with cast of characters from the PB Kids catalog and reality television.

Whatever you choose do to on a rainy day, just rest assured the weather will turn soon enough, and know that your kids love the bonding time with Mom or Dad. Enjoy!

Browse babysitter and nanny profiles, and schedule interviews at the click of a button at www.UrbanSitter.com.

6 Festive Kids’ Crafts That Are Good Enough to Eat

For busy parents and babysitters, what could be better than a delightful kid’s craft and a snack wrapped into one? Edible art projects keep kids entertained, engaged and fed without much fuss. This is incredibly helpful especially when you are preparing holiday meals and entertaining guests. These are also great projects to have grandparents or guests spearhead while you cook–or set these up with your sitter for a fun afternoon activity.

Edible Festive Kids’ Craft Projects

Fruit Gobbler Turkey

via Spoonful
via Spoonful

Unload some of your holiday dirty work by letting the kids create the centerpiece for the big Turkey Day table. This big turkey is loaded with fruits and veggies that your kids will love assembling (while you work on dinner), and enjoy gobbling up just as much. You’ll need:

Bosc pear (head), Melon (body), Cheese (beak and tail feathers), Red pepper (snood, feet and side feathers), Raisins (eyes), Grapes (tail feathers), Bamboo skewers, Toothpicks.

Find complete instructions at Food.com.

Hairy Spider

via Kids Activities Blog

Forget about the Halloween craft featuring a fat marshmallow as the body of a creepy crawler. These hairy spiders are of the healthy variety and for tots fascinated by bugs and they work any time of year. We can thank Kids Activities Blog for showing us how to easily create a healthy snack with a chunk of banana dipped in flax seed, pretzels for spider legs and raisins for eyes.

Another Turkey to Gobble

via Cute Food For Kids

There’s no shortage of edible turkey crafts to tackle. We think this guy is pretty darn cute and simple enough for little kids to handle without frustration. There are two options – a healthy one made with clementine sections and a “special treat” version that uses skewers of candy for feathers. Both work the same way: cut the bottom off of an apple, flip it around and stick it to the other end with a toothpick to create a stable base. Next, thread oranges or candy and marshmallows to toothpicks and insert for the bird’s feather. Create a head and face out of construction paper, and let your own little turkey stick it on the apple body with another toothpick.

Candy Necklaces

via Blondie and Brownies

Creating candy necklaces is a smart activity to help kids practice counting and patterns and to improve their fine motor skills. It also makes for a great project for a party, since it’s relatively simple and low fuss. There are tons of options for edible bits to string for a DIY edible necklace. Think fruit loops, mini marshmallows, Cheerios and pretzels. Blondie and Brownies suggests buying a few yarn darners, essentially large-eyed needles, to help with the threading (she found a set of 7 at Walmart for under $2).

A Mouthful of Teeth

via Kid Spot
via Kid Spot

Apple slices + peanut butter + mini marshmellows = a mouthful of teeth! No detailed instructions are needed for this adorable and yummy craft. Simply slice apples, spread with peanut butter or a nut-free alternative (cream cheese would work well) for denture cream, and stick mini marshmallows along the “gums” for teeth. Voila! Who wouldn’t smile at these?

Cheesy Reindeer

cheesereindeer
via Cute Food For Kids

You may cringe at the thought or jump for joy, but November 29 marks the start of the Christmas season! Get your kids in the spirit by plunging into a wintertime craft. Adorable reindeer are perfect for little hands to create with a Laughing Cow cheese wedge, pretzels for antlers, olives for eyes and a bit of red pepper for a nose. Cute Food for Kids provides a handy tip – use a straw from a juice box to punch out tiny eyes from an olive, and a fatter straw to create the nose from a bell pepper.

Leave these handy craft activities with your sitter while you’re out holiday shopping – search for babysitters online at www.UrbanSitter.com.

Get Onboard with an Arm Full of DIY Bracelets!

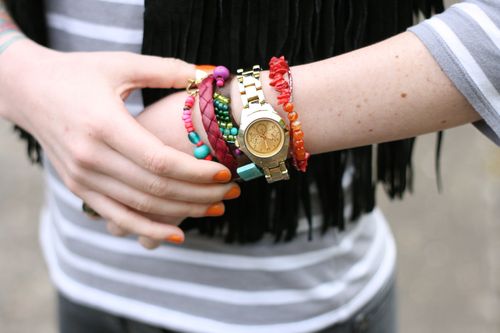
bracelet trend via a beautiful mess
via A Beautiful Mess

Have you noticed that bracelets are all the rage these days? You can get current and also score big points with your child by arming your babysitter with these awesome DIY bracelet craft ideas. We’ve rounded up 10 DIY Bracelets that kids – little and big, girl and boy – will go wild to create and wear!

1. Popsicle Stick Bracelets

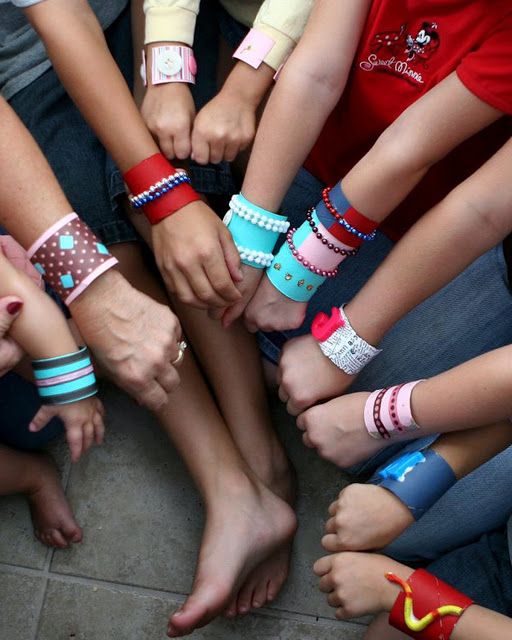
Thank you Molly Moo for providing the inspiration and showing us how to make popsicle sticks pliable enough to wrap around a glass into the shape of a bracelet. Once the sticks are dry, you can decorate them with wasabi tape (for instant gratification) or embroidery thread with the ends of the thread capped with beads for a dangly look.

Molly Moo bracelets
via Molly Moo

2. Felt Flower Bracelets

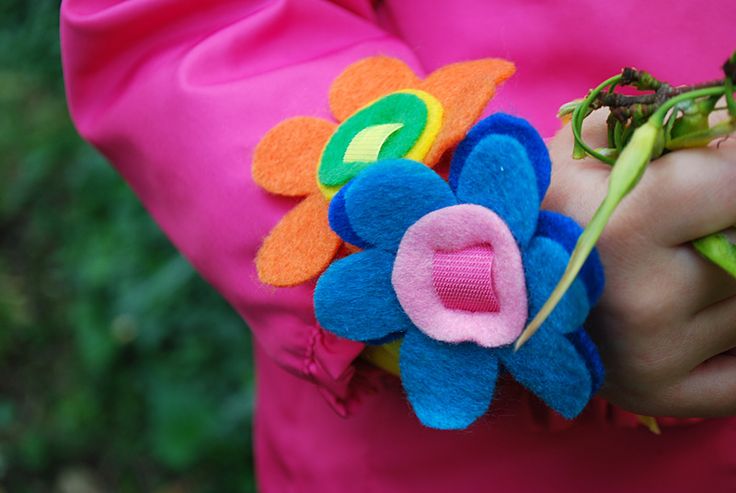
Though gorgeous, this craft require a bit more manual dexterity and involves more steps than some of the others. The bracelets are delightful for little kids to wear, but plan on your sitter, an older sibling or yourself doing much of work. You can download a free pattern for the felt flowers and you’ll need to purchase a roll of Velcro, along with felt. Merriment Design recommends something called Velcro Plant Ties, which is basically a roll of a thin strip of Velcro, which will serve as the base of your bracelet.

Felt Flower Bracelets via Merriment Design

3. Straw Bracelets

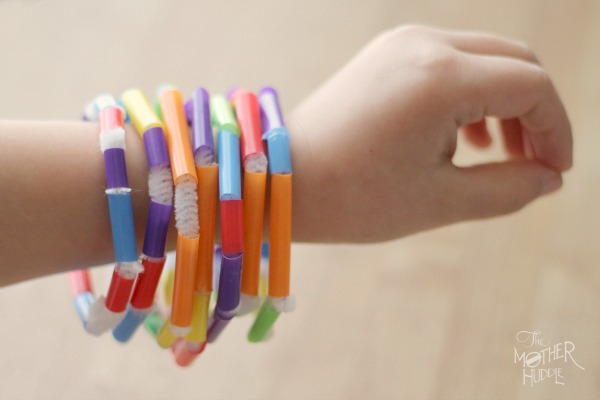
Here’s a simple, sweet project perfect for tackling when you have really little kids involved. The bracelet is cute enough that older kids won’t mind that it’s as easy as cutting drinking straws into pieces (an adult can do the cutting for little ones) and stringing them onto pipe cleaners, which are then twisted to form a bracelet. You can get bigger kids more interested by encouraging them to create patterns with the different color pieces.

Straw Bracelets via Mother Huddle

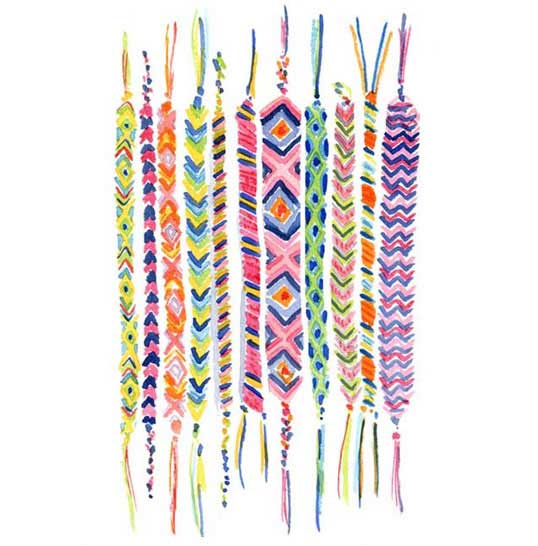
4. Friendship Bracelets

Wow, these bring back memories! Remember making these when you were a kid, loading up your arms with them and gifting and trading them with friends? If the how-to isn’t too fresh in your mind, check out this great tutorial from Apartment Therapy.  It’ll be like riding a bike. Before you know it, you’ll be whipping out a few to bestow on your little one and maybe just helping her to start a new trend in the hood.

Friendship Bracelets via Apartment Therapy

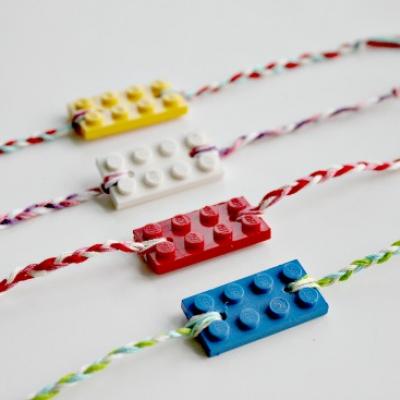
5. LEGO Bracelets

What’s just as popular with kids as bracelets? Why, LEGOSs, of course.  There is a small supply list for these, though be forewarned that the project requires a drill. Thanks to The Centsible Life for listing the requirements – (lots of) flat LEGO bricks, a drill and 3/32″ drill bit, embroidery thread (three colors per brick) and scissors. You or a handy sitter will need to prepare the bricks for your kids to string by stacking bricks and drilling a small hole on each end of the stack. Complete instructions included here.

LEGO Bracelets via Tip Junkie

6. Pom Pom Bracelets

Martha Stewart showcases Pom Pom bracelets as a winter holiday accessory, which would be lovely, but we think they’d also make for cheerful, colorful, summery arm candy. Buy pom-poms with holes in them, and help kids thread them onto clear stretchy beading cord. Tie off  the ends with several double knots.

Pom Pom Bracelets via Martha Stewart

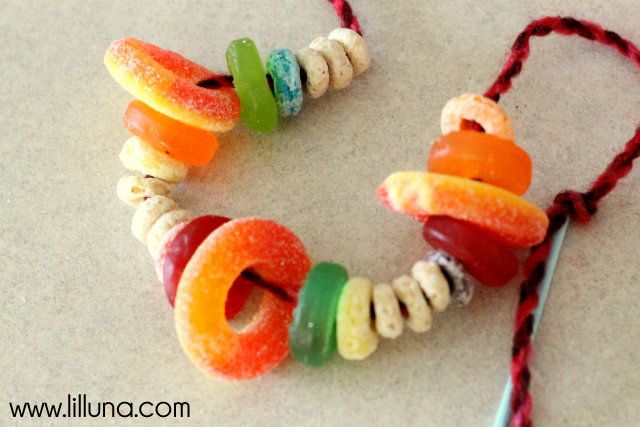
7. Candy Bracelets

Imagine telling your kids you are about to provide a fun craft to make, candy to eat and a new piece of jewelry to wear! You’ll need to hit the candy and cereal isles to stock up on supplies for these yummy, wearable treats. Lila Luna used Cheerios, Froot Loops, Peach Rings and Gummy Lifesavers, but any candy or cereal with a hole in the middle will work. Simply help kids string them on length of yarn. It’s helpful to use a blunt, plastic needle for threading.

Candy Bracelets via Lil Luna

8. Wooden Bead Bracelets

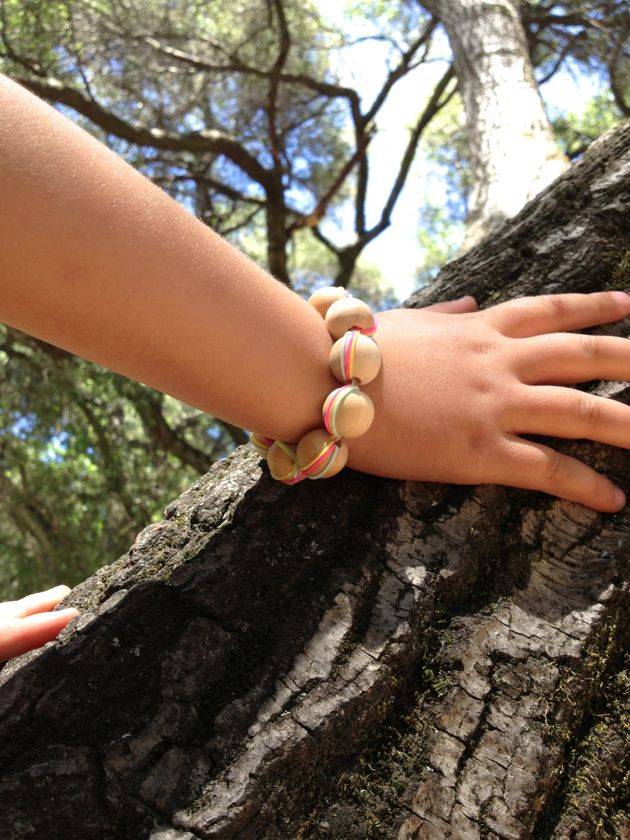
Here’s a sweet, modern take on old-school wooden beads on a cord. You need nothing more than a bag of ¾” wooden beads,  1mm stretch cord (three colors are ideal, but you can certainly make these with more or less), and scissors to cut the elastic-like stretch cord. Playful Learning gives a simple tutorial:

  • Count out 10-12 beads
  • Measure 3 strands of stretch cord at 18”
  • Holding ends together, thread cord through the first bead.
  • Pull the ends through, wrap them around the bead, and pull back through
  • Pull taut to secure, leaving about 2” of cord length at the end
  • Using the remainder of the cord, repeat looping and pulling through on the remaining beads until all ten are lined up snugly.
  • Double knot and tightly tug the cord taut at the end and trim to about 1/4”

Wooden Bead Bracelets via Playful Learning

9. Super Easy Button Bracelet

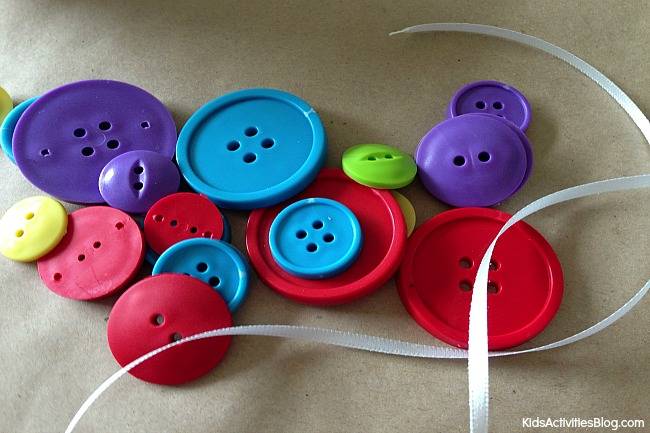
A button bracelet is excellent for building fine motor skills. You can cater to your child’s age by using buttons with bigger holes for little kids and smaller buttons for older kids. Buttons with smaller holes will require a needle for threading the ribbon. You can find blunt needles that are safer for kids to use. Simply gather a collection of buttons and some ribbon to string through the holes. Weave the ribbon through the buttons, coming up from underneath the button, crossing over the top, and dipping back down again on the other side of the button. Once you have threaded on enough buttons for the length of your bracelet, tie the two ends of ribbon together and voila, a new bracelet!

Button Bracelets via Kids Activities

10. Secret Message Ribbon Bracelets

Not your ordinary friendship bracelet, these lovelies have a secret message written on the inside. And just as nice, they take only minutes to make. You’ll need ribbon, self-adhesive Velcro (bought as precut circles or strips you cut yourself), tacky glue (optional), a white office label and a pen or marker to write your message. Instructions via Spoonful: Cut the ribbon into a piece long enough to wrap around your child’s wrist with extra for folding under the ends. Fold down one end of the ribbon and adhere one half of a Velcro piece, then flip over the ribbon, fold down the end, and attach the other half of the Velcro. Add a drop of glue under each piece of Velcro if needed (depends on the ribbon and Velcro used). Cut the label to fit (if necessary), write a message on it, then stick it to the inside of the bracelet.

Secret Message Ribbon Bracelets via Spoonful

Remember, there are plenty of crafty babysitters ready and willing to lead the charge if DIY is not your thing!  

Get Your Red, White and Blue On with Crafts + Recipes!

Fire up your family’s patriotism with these fun craft and recipe ideas for celebrating the Fourth of July! We’ve rounded up two easy 4th of July crafts and two deliciously festive recipes.

Patriotic Bike Streamers via AlphaMom

Craft: DIY Patriotic Streamers

Lead your own neighborhood parade in style! Tie some streamers and balloons to your stroller and help your kids decorate their bike or scooter with these DIY patriotic streamers we found on AlphaMom.

Supply list is simple:

1. a pair of toilet paper tubes
2. curling ribbon and/or crepe paper streamers
3. inexpensive water-based children’s poster paint in patriotic colors
4. star stickers
5. paint brushes
6. a stapler and/or normal household tape

To create:

  1. Have kids paint the tubes one color –the base coat. (Resist mixing colors since you’ll end up with purple or pink instead of the red white and blue theme!).
  2. Once base coat is dry, let them decorate the tube by painting on stars, stripes, flags, hearts, whatever else says 4th of July. And adding stickers, too.
  3. Once everything is dry, staple and/or tape the streamers or curling ribbon in strips to the end of the tubes. Curl the ribbons.
  4. Slip the decorated tubes of streamers over the ends of your child’s handle bars, and voila, patriotic streamers!

You’ll all have a blast circling the block in holiday style. Blow some horns, shake some noise makers and belt out our national anthem to your heart’s content. Your kids will never forget it.

Patriotic Streamers for Bikes and Scooters via AlphaMom

Recipe: Fruity Yogurt “Bomb Pops”

Homemade Bomb Pops from Healthnut Foodie

Remember those brilliant red, white and blue popsicles you likely devoured as a child?  They scream patriotism!  Make your own healthy version with yogurt, blueberries and strawberries:

Homemade Bomb Pops (Recipe care of Healthnut Foodie)

Makes 16 small or 8 large popsicles

For the red layer:  Puree 1 pint hulled strawberries with 1/2 cup vanilla yogurt.  Fill popsicle molds 1/3 of the way full with strawberry/yogurt mixture.  Transfer molds to freezer and freeze for about 30 minutes, to prevent the layers from mixing.  (There is no need to put the sticks in at this time.)  Rinse blender.

For the white layer:  When 30 minutes have lapsed, remove popsicle molds from freezer.  Reserve 3/4 cup of the yogurt for the blue layer.  Use remaining vanilla yogurt to fill molds 2/3 of the way full.  Return popsicles to freezer just long enough to prepare the blue layer.

For the blue layer:  Puree 1 1/2 cups blueberries with remaining 3/4 cup vanilla yogurt.  Remove popsicles from freezer and fill with blueberry puree.  Add sticks to popsicles and return to freezer.  Freeze for at least 2 hours.  Serve and enjoy!

Or, you could always throw caution to the wind (after all, it is a holiday!) and go for the ones you used to eat as a kid.  You can find them at Walmart.


Sparkler Printable from Delightfully Noted

Craft: Sparkler Printables

Light up the night with sparkler favors. Thanks to this free printable, you can turn any ordinary box of sparklers into fun, festive favors for any family or friend gathering. Download the sparkler printables here, and be sure to print them on heavy card stock. Cut a slit above and below the solid blue block and slide a few sparklers through. ** Of course, never leave children unattended with sparklers, and be sure to explain the dangers of fire and the importance of being careful of sparklers before you light them. **

Recipe: Refreshing Watermelon Sundaes


Red White and Blue Sundaes from Watermelon.org

Red White & Blue Watermelon Sundaes

Recipe adapted by Babble from watermelon.org

Use a melon scooper to make watermelon balls (or could use frozen yogurt or raspberry sorbet)
4 cups watermelon balls
2 cups fresh blueberries
1 cup sweetened whipped cream or thick plain or vanilla yogurt
Red, white and blue star sprinkles

Gently mix together the watermelon and blueberries. Divide among 4 sundae bowls. Top each with a dollop of whipped cream or yogurt and sprinkle with red ,white and blue sprinkles. Serve immediately.

Serves 4.

Keep your party going this July 4th by joining your community at a family-friendly holiday parade, fireworks show or festival. Stay tuned for our July 4th Even Guide for ideas and info!

Find mom-trusted babysitters at UrbanSitter.com.

Handy DIY Printables for Personalized Teacher Appreciation Gifts

teacher-appreciation-gift-ideas

The end up the school year means it’s time to thank your children’s teachers for their tireless dedication, patience and nurturing. Thanks to downloadable printables provided by some of the most talented and generous bloggers out there, you can give a gift that’s  a little more special and a little more personal. These cute gift ideas and free printables are just what you need to leave a smile on any teacher’s face.

Movie Day On Me

Who wouldn’t appreciate a gift certificate to see a movie and a bunch of sweet treats to take along? Tater Tots and Jello is providing a free downable striped fry box template  and gift tags to insert on the front of the box that say “Thanks for Making Me Feel Like a STAR.” She’s even provided two color options. Simply print the box template on card stock, and assemble by folding on the dotted lines. Once assembled, fill with a gift card and your teacher’s favorite candy.

Movie Pass Tater Tots and Jello

Reusable Tumbler

A plastic cup with a lid and a straw makes for a practical gift and a sturdy receptacle for handmade thank you notes and kid drawings you can roll and insert inside. Make it an even better gift by inserting individual serving-size drink mixes, teas or instant coffee, or even a gift certicate to a coffee or smoothie shop. Top it off with an eye-catching flag to hang from the straw. Free flag printables with thank you note by Lisa Storms.

via Lisa Storms
via Lisa Storms


Succulent Garden

Here’s a DIY project that doesn’t take (too) much work and produces impressive results. The Idea Room tells you how to create a succulent garden in a customized, galvanized pot. The pot is mod-podged with pages from old dictionaries that include teacher-related words, such as guidance, grow and nurture. You’ll need the following supplies:

Pot, container or bucket

Old Dictionary Pages

Mod Podge

Paint Brush

Potting Soil

Succulents

For a little more guidance and a printable label that reads “Teachers Plant Seeds of Knowledge that will Last Forever” click here. (Be forewarned, The Idea Room requires that you Like them on their Facebook page before they provide the printable.)

via The Idea Room
via The Idea Room

Extra-ordinary Teacher Treats Bags

If you have multiple kids and/or multiple teachers to thank (don’t forget music teachers, art teachers, aides, and bus drivers),  a mini treat bag topped with a cute label that reads “You Are One EXTRAordinary Teacher!” is easy and affordable, and just as thoughtful as a bigger gift. Sweet Metel Moments created the free printable as a fold-over tag for 3 x4 inch plastic treat bags filled with Extra gum. Simply print the labels, and staple them to the tops of the filled bags. If you aren’t a fan of the gum, there’s another label that reads “Thanks for a Being Such a Sweet Teacher.” It’d be just right for a bag filled with any candy… and is just as cute.

via Sweet Metel Moments


via Sweet Metel Moments

Summer is coming! Find a summer babysitter at UrbanSitter.

7 Pumpkin Projects for Little Ones

Photo by D Sharon Pruitt

There’s a pretty good chance you’ve taken your kids to a pumpkin patch, farmer’s market or even a grocery store this weekend, and are now living with a menagerie of pumpkins, little and big. Do you realize you’re sitting on a goldmine of kid craft potential?!

Bring your pumpkins to the table, gather your craft supplies, call a friend or two to make a fun play date out of it, and get down to business! Not the crafty type or invited more than a few friends? Call in a sitter to help!

Here are 7 of our favorite pumpkin projects:

Gourd Family: Stack miniature pumpkins to build a replica of your own family.  The gourd people on MarthaStewart.com are made by gluing natural materials, such as acorns, nuts, leaves, and flowers… which means you can start your project by taking a nature walk to gather supplies.

Giggly Ghoul: They’ll be giggling so hard, they’ll have a hard time finishing this one. Talk about bang for your buck – insert two thumbtacks for eyes,  carve out a mouth and insert removable teeth. How can these not have you in stitches?!

Fall Leaves + Pumpkin = Perfect decoration for the table, foyer or front porch: Gather gorgeous fall leaves and dry them under a book for several days. Brush decoupage glue on a pumpkin (white is especially nice). Arrange the leaves on the pumpkin’s surface, cutting small slits along the edges of the leaves as you go, so they’ll fit the pumpkin’s contours. Coat the decorated surface in decoupage glue.

Message on a Pumpkin: Put on your thinking caps and come up with a fun message to write/paint/glue on your pumpkins. How about your family name (with a pumpkin for each letter), or a spooky Halloween shout-out like “Boo,” “Beware,” or “Who Goes There?!” You can cater to your kids’ ages and abilities, keeping it simple with glitter glue or stepping it up by glue-gunning buttons, acorns or candy to spell out your message.

Give Thanks: How about making a festive vessel for a bouquet of fall flowers? Clean out the insides of your pumpkin (save the seeds for snack time), and insert a handful of fall flowers or branches. You can make it a spooky treat (and a bigger project) by first painting the pumpkin, then giving it a face. Don’t carve out too much, as you’ll want to fill it with a bit of water if you hope to make it last.

Talking Pumpkin: This one will get the neighborhood trick-or-treaters talking! Carve a face for your pumpkin, scary or silly will work. Instead of making a removable top, cut a hole in the bottom. Once cleaned and carved, sit your masterpiece atop a baby monitor. Voila, you have a talking pumpkin!

Roasted Pumpkin Seeds: Wait, don’t throw out that muck! Make a toasty snack of pumpkin seeds. It’s as simple as digging through the strings and pulp – what better job for a crew of little hands – and cleaning off the seeds. Spread the pumpkin seeds on baking sheet, drizzle with oil and sprinkle with salt. Bake 45 minutes at 325 degrees, stirring occasionally, until lightly toasted. Yum!

Need a sitter for the pre- or post-Halloween weekend? Log on to UrbanSitter and search for a babysitter by date & time.