DIY Parents: Getting Ready for the Big Move…Before You Move

By Smith Banfield

Moving into a new apartment can be overwhelmingly stressful—especially when you’ve add kids to the already chaotic mix. To figure out how to mitigate some of the horror, we asked styling consultant Smith Banfield of Clear Space in New York City for her top survival tips.

1. When you move, you’re stepping into the future—but not everything you own needs to go there with you, because most of that stuff is from your past. Before you just empty drawers into packing boxes, take some time to go through everything and really assess if you have to bring it along into your new, and doubtless limited, space. That having been said, don’t make those decisions for anyone but yourself. My mother was really harsh with me about things she’d bought me that were expensive and she thought we should keep, but ultimately, she decided what was important to me as a child rather than letting me decide. So, don’t force your children to keep anything they don’t want. If you think it’s worth saving, donate it to another family that can’t afford it. And if your child really feels she needs to hang on to something, let her make that decision.

2.  Categorize things before you move! There are boxes that you know will live in certain rooms, so you can transfer things from the old kitchen to the new kitchen; if you have comparable space in the new place, you can even transfer things from the top kitchen drawer, the middle kitchen drawer, and so on—mark all your boxes clearly with the room and its place in the room. You may need to modify this if you’re moving into a smaller space. And you should definitely throw away anything item you wouldn’t purchase tomorrow if you found it in its current condition at a garage sale—like a disintegrating spatula. Curate! So many people who say, “I’ll deal with it later,” then they wind up with a pile of boxes in a room that soon becomes invisible, and you put a lamp on it. It’s self-sabotaging, when what you really want when you move is to step into a new life, with a clean slate.

3.  Take the time to measure every inch of your new space before you move in, and then take a hard look at the furniture you have, so you don’t move a bulky couch that’s not going to fit through the door—because remember, everything you put on the moving truck increases the cost. What I do is take blue painters tape and tape it down on the floor where I think any object is going to go. If it looks like a tight fit, like the king bed is not going to fit in the bedroom, you can decide to buy a smaller bed. It’s also important to slow down and analyze your space once you’ve actually moved all your stuff into it. Before you do a huge redesign, live in the space for six months, so you and your family will learn your habits in terms of how you use it. I know you want everything to be perfect, but it is a process. That goes for painting the walls, too. You can have your landlord put up a fresh coat of white paint, and then wait and see what the lighting is like at night, or in winter; this avoids the mistake of deciding on a pretty blue for the dining room, only to discover that there’s not a lot of light coming in in December and the blue just looks depressing. It might take an entire year for you to feel like you’re completely settled in. But that’s okay!

Crafty Kids: How to Make Beaded Key Fobs

The title of this craft begs the questions: what exactly is a fob, and why on earth would any kid want to make one (aside from the fact, of course, that they’re really pretty)?

Traditionally—meaning, in the late 19th century—a fob was a decorative chain that attached your pocket watch to your person. Since not many folks wear pocket watches anymore, the craft is reimagined here by our friends at Crafting Community as a decoration for a key. And as every kid knows, getting your own key to the house is an enormous rite of passage, one that symbolizes a surge in responsibility as well as a parent’s recognition of it.

Why make a key fob? To celebrate that oh-so-important key and make it look as important as it really is. Not to mention, help your kid find it in her cluttered backpack!

What you’ll need:

Plastic lacing
Scissors
Metal clips
Pony beads in assorted colors

1. Start with about 6 feet of plastic lacing, fold it in half, and put it on a metal clip.

2. Thread your first bead onto one end of the cord, then thread the other end of the cord through the opposite side of the bead.

3. Begin your design by adding the next row of beads. To do this, slip on 2 beads to the right half of the lacing and then thread the left side of lacing through both beads.

4. Continue to increase or decrease by 1 bead each row until your design takes shape. Once your design is finished, make a knot and hide the little ends under the last row of beads. Now it’s time to hook on that key!

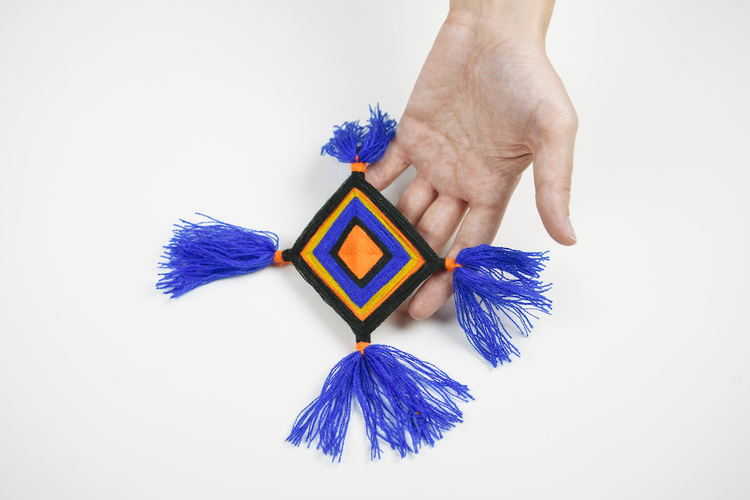
Crafty Kids: How to Make a Woven Yarn God’s Eye

Woven Yarn God's Eye

The ojo de Dios (Spanish for “eye of God”) is a folk toy with origins among the Huichol Indians of the Sierra Madre. The four points of the crossed sticks are said to represent the elements of earth, air, water, and fire; the finished eye, replete with alternating stripes of yarn, is meant to offer health, fortune, and long life.

Extremely simple to put together, this bright, festive craft from our friends at Crafting Community forms the base for a great crib mobile—something for an older sibling to make for the new baby in the house. It’s also a super entry point for talking to kids about American history—and for parents to learn a little something, too.

What you’ll need:

  • Two sticks of equal length
  • Brightly colored yarn in 3 or 4 color
  • Scissors

1. Grab two sticks and tie them together in the middle with the end of your ball of yarn. Twist the sticks to form a ‘+’.


2. Wrapping in a clockwise direction, wind your yarn over and around 1, then 2, then 3, then 4. (See image at right for technique).

3. To switch up your colors, simply snip the yarn you’re working with and tie on a new color. Trim the excess and continue wrapping.

4. To finish your god’s eye, top knot your yarn around your final stick twice. Trim the excess yarn and you’re done!

To add tassels:

1. Loop yarn around your fingers 15x

2. Thread another piece of yarn through your loop and make a knot with long tails. Cut the end of your yarn loop to create fringe.

3. Tie your tassel on, knotting it to your gods eye on the back side.

4. Wrap one side of the tails around the arm of your gods eye several times, then knot it to the other tail to finish.

Crafty Kids: Floating Container Ship

By Chris Barnardo

A super quick and easy model to put together, this floating container ship is made from a couple of old dishwasher or washing machine liquid bottles, along with a few other bits and pieces. There’s plenty of fun to be had both making and playing with it—kids love naming their ship, writing its name on it in permanent marker, and then sailing it across the great Bath (or Swimming Pool) Ocean.

What you’ll need:

  • Glue gun
  • Marker
  • Craft knife
  • Large dishwasher soap bottle
  • Small dishwasher soap bottle
  • Piece of cardboard
  • A few small stones
  • Shower gel bottle
  • Milk carton cap
  • Liquid detergent bottle cap
  • Yogurt cup base

1.     To make a floating ship, you’ll need a plastic bottle for the hull, and another, smaller bottle for the cabin. Mark lines around the bottles following the diagram above, using a permanent marker. Use your craft knife to cut.

2.     Place the hull part upside down on a piece of thick cardboard and draw around it with a marker.

3.     Cut out the deck slightly inside the line so that the cardboard will just fit inside the hull.

4.     Cut some small supports out of cardboard, at the right height to allow the deck to be slightly recessed. Glue these to the underside of the deck. Glue around the edge of the deck and slide in. Glue the milk bottle top into the detergent bottle opening. To prevent your ship from being top heavy, glue a few small stones inside the hull before you glue the deck into position.

5.     With deck in place, glue around its seams to make sure it’s waterproof.

6.     Glue the cabin upside down to the deck, then glue the yogurt cup end to the deck.

7.     Cut the end off a shower gel pack and glue to the front of the cabin to make the bridge. Glue a detergent bottle top to the top of the bridge to make a funnel.

8.     Decorate with marker, then get ready to launch your ship!

Excerpted from Made with Dad by Chris Barnardo, (c) 2015 Skyhorse Publishing.

Crafty Kids: Nifty Back-To-School Projects– with Tape!

Duct tape crafts have been hot for the past couple of years because a) they’re easy to put together and b) pretty much every child loves tape! You can help boost the excitement for back-to-school in your kids and tweens with these two fun (and useful) crafts from our friends at Duck Brand Tape.

Chalk Circle Calendar

You will need:

  • Cardstock
  • Scissors
  • Duck brand chalkboard tap
  • Duck tape

1. Make a 1-1/2-inch template for your day-of-the-week circles out of cardstock, then trace the template on the back of the chalkboard tape, 42 times, at cut each circle out.

2. Trace letters for the days of the week on the back of the Duck tape, then cut out and stick one of each to 7 of the circles.

3. Now, piece by piece, stick your calendar to your wall, inside your closet, wherever it’s handy!

Desk Organizer

You will need:

  • 12 empty Duck tape rolls
  • Duck tape
  • Scissors

1. Tape 2 empty Duck tape rolls together to get a double-long tube. Fold over any excess tape. Then, cover the inside of the roll with Duck tape, too. Repeat 5 times.

2. Using thin strips of Duck tape, attach the tubes to make a pyramid shape. Now you’re ready to load your organizer up with all your pens and pencils for the school year!

Crafty Kids: Straw Rockets

This sweet, summer-celebratory craft from our friends at Kiwi Crate is great fun when you’re wrangling a whole group of neighborhood kids who could use a little (but not a lot!) of structured activity. It’s super quick and easy to pull together, and gets (and keeps) the whole gang outside.

What you’ll need:

  • Several pieces of origami paper, or any other square-shaped paper
  • Straws (fat ones from bubble tea stores work best)
  • Tape (used here: long pieces of metallic tape to seal the side, as well as shorter tape squares to close the top)
  • Curling ribbon (optional)

1. With the “nice” side of the paper facing up, place a long strip of tape, sticky side down, along one edge of the paper.  Half the tape should hang over the edge of the paper.

2. Flip the paper over. Starting opposite the tape, roll the paper loosely around the straw.  Seal with tape to make a tube.

3. Fold one end of the tube over and tape it closed. Make sure the tube is completely sealed so no air can get out.

4. If you’d like, decorate your rocket by taping on pieces of ribbon.

5. Blow into the straw to launch your rocket. Blast off!

Boredom Busters to the Rescue!

The blogosphere is abuzz with ideas for “boredom boxes” which are cleverly assembled collections of ideas and tools for kids to create and for parents to have at the ready for the inevitable cries of “Mom, I’m bored!” Boredom boxes, sometimes called boredom busters, include ideas for fun activities to entertain, occupy and sometimes educate kids – which is especially helpful when the novelty of summer break has begun to fade and you need a little extra help keeping kids busy. Save the day at your house by having a boredom box of your own. You’ll secure your spot at the top of your sitter’s favorites list if you leave one for her, too!

Here are a few clever boredom boxes worth replicating for your own childcare arsenal for this summer and beyond.

For the Printables Loyalist
Oh, the beauty of printables! Printables are like having a really crafty assistant who makes you look incredibly organized and creative. These printables (though not free), make your job as easy as printing and sticking a label to the outside of your choice of box, and filling the box with the activity cards. Voila! (via The Dating Divas)

via Dating Divas

For the Crafty Kid
An art jar filled with bits and pieces to spark imaginations and encourage creativity. It’s an economical solution and a nice way to recycle the various ribbon remnants, extra buttons, spare googley-eyes, lost and found Lego pieces, scrap paper, greeting cards…whatever you can scrounge up from the junk drawer, office and art bin, along with a few glue sticks. (via Bloom)

Screen Shot 2014-07-07 at 5.24.54 PM

For a Well-Stocked Arsenal
These totally replicable mini boredom box ideas are awesome. Simply purchase small plastic bins for each box, but you can also use shoeboxes or any other box or bag you can find in your house. Brainstorm a few themes that are age appropriate such as exploring creativity, developing fine motor skills, working on math, sensory play, and free play. Some fun and rewarding activities include “Decorate Your Bike for a Parade,” “Help the Homeless“ or “Draw a scene from your favorite chapter in this book.” (via Premeditated Leftovers)

Screen Shot 2014-07-07 at 5.32.30 PM

For Thinking Outside the Box
If you’re not into the idea of actually creating boxes of activities to keep your kids busy, here’s the perfect fallback. The list of 25 awesome activities to keep boys busy is aimed at entertaining boys – but the activities, most of them unique and creative, will appeal to little girls, too. We especially like the Dinosaur Eggs and Potion Lab ideas. Bookmark this page and keep it handy. (via I am THAT Lady!)

Screen Shot 2014-07-07 at 5.35.47 PM

These boredom busters are sure to save many a day at your house, and help you to create some sweet summer memories with your kids. Better yet, leave a boredom box with your sitter so your kids have something to look forward to when you’re out!

Let’s Hear It For the Red, White and Blue!

The 4th of July is nearly upon us – get the party started with fun treats and decorations that’ll pump up the patriotism at your house. All you need for a fantastic July 4th BBQ is good company, good food and these fun, festive decorations and sweet treats.

julia-Kid with flag - 4th of July


Red, White and Blueberry Yogurt Popsicles
No food coloring or added sugar in these patriotic treats. They are made with blueberries and raspberries or strawberries and Greek yogurt for the delicious white stripes. (via The View from Great Island)

the view from g island 2

July 4th Cake Toppers
Free printable cake toppers take the all-American Rice Crispy square or any cake, brownie or cupcake up an impressive notch. (via Kara’s Party Ideas)

1

DIY Rocket Garland
Rocket poppers are a fun craft for the kids and are great fun when filled with confetti or make an adorable decoration when hung together as a festive garland. (via Simplified Bee)

1

Firecracker Favors
Adorable candy-filled firecrackers make a great centerpiece and a simple take-home for your guests. (via Crafts Unleashed)

via Crafts Unleashed

Patriotic Silverware Holders
Spark up your tabletop with silverware holders made from craft supplies and a free printable. (via Lil Luna)

Screen Shot 2014-07-02 at 12.08.43 PM

What other crafts and treats are you serving up this 4th of July? Share them with us below.

Teacher Gifts to Show Your Thanks

meg_son_flowerWith the end of the school year in sight, it’s time to think about teacher gifts for your children’s tireless educators. Teachers have one of the toughest jobs on the planet. Each September, families hand over their children, and entrust teachers to nurture, enrich and fill their minds with knowledge and responsibility to help prepare for the world.

How do you show your appreciation and gratitude? Whether you’d like to give a homemade gift or something practical, or you’re charged with buying or creating a gift from the whole class, we have thoughtful gift ideas that will go easy on your time and budget.

Group Teacher Gifts from the Class

If you’re the lucky parent charged with collecting contributions and choosing a class gift for the teacher, choose a collectively built gift that’s simple and sure to be loved. Choose a theme and assemble a gift basket or package that everyone in the class can contribute to fill.

To avoid the flurry of email communication that can flood your inbox when coordinating for a large group, rely on services such as Sign Up Genius, which will handle a lot of the coordination and help avoid duplicate purchases. To hold all the loot, use a cute bag or tote, which you or another family in the class can contribute.

Here are cute ideas for the class-contributed contents for a summer-themed package:

via Tidbits and Twine
  • Beach towel
  • Gift certificate for Mani/pedi
  • Magazine
  • Paperback book
  • Journal
  • Small photo album
  • Insulated tumbler and drink mix
  • Sunscreen
  • Lip balm
  • Summery nail polish
  • Gift card to department store, a sunglasses or sport store
  • Monogrammed Frisbee
  • Cute drinking straws or drink stirs
  • Cocktail napkins
  • Reusable ice cubes in a fun summer shape
  • Outdoor tumblers and a pitcher
  • Deck of cards or a game

Quick and Easy “Homemade” Teacher Gifts

Looking to go beyond a store bought gift, but have less time than inspiration? Rather than tackle a big DIY project, you can add an extra, homemade touch to a store-bought (or homegrown) gift of flowers or a potted plant. Personalizing an always appreciated gift of green shows you’ve gone the extra mile to show you care. Here are three sweet and simple ways to embellish a potted plant or bouquet of flowers.

1. Chalkboard Pot from The Idea Room on Skip to My Lou you can customize with a personal note to your child’s teacher.

via The Idea Room
via The Idea Room

2. Handmade Container from Love of Family and Home.

via Love of Family and Home

3. DIY Succulent Terrarium from That’s Quirky.

via That's Quirky
via That’s Quirky

Picking Up a Practical Teacher Gift and Packaging It Just Right

Save yourself the agonizing and shopping for the perfect gift. Nothing is more useful to a hardworking teacher on a limited salary than a gift card to a favorite store, café or restaurant. A gift card allows him or her to splurge or spend as they like. These fun, free gift card holders to print will personalize a gift that may seem a bit impersonal. There’s one for coffee, a book store, the movies and good ole Target.

gift holder hip2save
via hip2save

No matter how you choose to thank your child’s teacher, remember that a personal note of thanks from you and your child is often the most important gift of all. Find the perfect babysitter for summer break at UrbanSitter.

5 Fun Ways to Decorate Easter Eggs with Kids

Decorating Easter eggs with kids isn’t always as easy as it sounds. Fragile eggs + stainable dye often equals disaster, or at least a somewhat anxious parent or sitter. This year, opt for one of these simple, yet very cool techniques for decorating eggs with kids. They are fun to do and create some pretty impressive looking eggs.

Easter Mar 2008 copy


1. Chalkboard Eggs
How cool are these black eggs?! A really fun, graphic take on the traditional, dyed Easter egg, these funky eggs are just as easy to create as the dip-dyed version. Paint hard-boiled eggs with chalkboard paint – 2-3 coats are recommended for good coverage – and have kids doodle with chalk or wet chalk markers, which create really vivid color that pops against the black background. The blogger behind this DIY suggests creating a trough out of aluminum foil for holding the eggs while they dry. See her complete tutorial with handy photos for help.

via Brett Bara
via Brett Bara


2. Neon Eggs
Wow, food coloring has come a long way since we were kids! Pick up a box of Neon Food Coloring to create these eye-popping Easter beauties. These were created by dripping rubber cement over hard-boiled eggs before letting them sit in neon dye for at least five minutes. The long soak might be tough for the kids to wait out, but the results are worth it.

via Kirsten Gab
via Kirsten Gab


3. Glitter Eggs
Pull a Martha and forego the dye for a good douse of sparkly glitter. The fancy version of these glittery eggs calls for blowing the eggs out so you’re just decorating the shell. The technique makes the egg last for more than one season, but to make it a kid-friendly craft, forget the fragile shell and instead boil the eggs…making peace with the fact that you’ll have to toss them after a few days.

via Martha Stewart
via Martha Stewart


4. No-Dye, No-Mess Eggs
Just as pretty as dyed eggs, but way less mess. In other words, very kid-friendly… which translates into quick and easy. Instead of having kids plunk eggs into baths of dye, have them stick hard-boiled eggs with adhesive dots and roll in colored glitter.

via Mindful Mum
via Mindful Mum

5. Water Color Easter Eggs
Pretty eggs that are fun for even really little ones to create. Use a baking sheet to collect the extra dye that falls when simply spooning dye over eggs. Let dry completely after applying a color so the next color you add won’t run and turn your masterpiece into a muddy mess of muted shades.

via Spoon Fork Bacon


If these DIYs are a bit more work than you bargained for, opt for the even simpler techniques of decorating eggs with stickers, markers or temporary tattoos. You and your kids will have just as much fun!