Ideas for Babysitter Activities with a School-Aged Child

kids baking cookies with sitter

Hiring a babysitter for a school-age child is often met with some anxiety on both sides unless there are activities planned. The child wonders if the babysitter will make him eat his broccoli and the babysitter hopes against hope that the child is more spunky than sulky. What resources do you have to combat this situation?

Activities to do with kids appropriate for their age:

Ask their parents to pick the game, toy, or computer games they like playing the LEAST. You won’t have the disadvantage of repeatedly being asked to engage in a certain activity and the child will be happy an adult is taking interest in their neglected game or toy.

Have the child make his birthday list (or holiday list if it’s coming up). This is usually a huge hit. Take a plain old piece of paper and have the child write or draw their ultimate wish list. You can even use those umpteen catalogs that come in the mail for inspiration and/or art supplies — cut out what they want and paste on list. Voila!

Paper crafts for kids are among the most popular. If you are not super talented in this area (join the club), get online and look up some free kids crafts on Pinterest. Use the calendar for inspiration. Valentine’s Day? Make paper hearts from coffee filters! Columbus Day? Make a native American headdress from construction paper!

Easy games for kids involving hiding things. Hide a few objects around the house or in the yard and send them hunting. Give them a bag or basket and they’ll be even happier. For older children, make a treasure map. A meticulously-detailed map with clues along the way (akin to a scavenger hunt) will engage them for a while. Perhaps the winner gets to pick the bedtime story or an extra marshmallow in his hot cocoa.

UrbanSitter is ready when you are! Find a local babysitter through people you know and schedule jobs online in minutes.

Fun Activities for Kids and Babysitters: Ideas & Tips

babysitter makes fort

Even the best babysitters in your area may be at a loss for finding fun activities to do with your children. Your preferred babysitter may spend many long hours with your children in the months and years to come, and this is the time that should be fun and stimulating for them. If you want to encourage your babysitter to limit screen time and to engage your children while you are gone, suggest some of these thoughtful ideas.

Make Cookies

If your babysitter has basic baking skills, making cookies is a fun and delicious way to spend time. Frosted cut-out cookies take much more time to make than chocolate chip cookies, and they allow for more interaction with children. This is only one of many types of foods that children can participate in making. For example, they can make ice cream sundaes, cut-out shapes for their lunchtime sandwiches, a fruit salad with cutting help from the babysitter and more.

Build a Blanket Fort

Before you leave, pull out several blankets and sheets that can be used for the walls and ceiling of a living room or bedroom fort. The act of creating the fort can keep the kids and the babysitter busy for a while. Once the fort is created, they can play together, read books or even tell their own made-up stories in their shelter.

Create Works of Art

Many children love to draw, paint and work with clay. Other ideas include working on sand projects, making slime, creating snowflakes and more. Set aside several types of art supplies before leaving the house. The kids and babysitter can use the supplies in their own creative ways to produce beautiful or unique works of art.

Dance to Children’s Songs

If your children love music, another excellent idea is to recommend a dance party. You can compile a mix of songs that your kids enjoy, or you can suggest that your babysitter stream music from an app on his or her smartphone. This is a fun way to get your children moving regardless of outdoor weather conditions.

Play Board Games

Many kids love to play games with their parents, but you may not pull the games out as frequently as they may like. Set out a stack of your children’s favorite board games and card games. Regardless of your children’s ages, board games provide interactive fun that can extend potentially for several hours.

Work on Puzzles

An alternative to board games is puzzles. Simple puzzles are ideal for young children, and there are numerous puzzles that are increasingly challenging for older children. Determine your children’s skill level, attention span, and interests when picking out a puzzle.

You may go to great lengths to find the best babysitters in your area, but even these skilled, qualified professionals may not know what your children like to do or what activities are available in your home. Suggest or plan for some of these excellent activities so that your children truly enjoy spending time with their babysitter.

Crafty Kids: How to Make Maps of Your Neighborhood–and Your Imagination

Children love maps. The graphic imagery of even the simplest charts can give them lots to feast their eyes upon, and to dream about. But maps also help them make sense of the world around them—something grownups, who’ve committed thousands of routes to memory, often take for granted.

The warming weather provides the perfect opportunity to accompany your budding cartographer out into the neighborhood, to sketch up the way to a friend’s house, or the playground, or just once around the block. Some kids prefer to draw places they see in their imagination. Either way, inspired by the book Mapsby Aleksandra and Daniel Mizieliński, and featuring images from the accompanying Maps Activity Book, here we offer a primer in the ancient art of map making.

What you’ll need:

  • Writing implements—pencils and colored pencils, markers, pastels
  • Paper—either a printout of one of the templates below, or plain paper of your choosing

1.     Decide what you want to make a map of. Will it be a map of a place you know already—like your room or your block? Will it be a map of someplace big, like the whole Earth or a made-up planet? Or will it be a map of someplace small, like your school or your neighborhood? Take a tour of the place—if you can—to get the lay of the land.

2.     Map out your map. With light pencil or chalk marks, rough out where everything on your map will go: buildings, streets, parks, trees, oceans, cars—whatever you fancy! Then work on making your map more permanent, with firmer marks and color and details like windows on buildings, or waves on the sea, or leaves on your trees.

3.     Label the things you’ve drawn on your map: Nico’s house, the Indian Ocean, Christmas Street. Then, make a legend. A legend tells things like how many inches equal a mile, what the capital of your country is, and what the native language is. If you like, you can also draw pictures of local birds and flowers, and the people (or aliens!) who live here.

4.     Finally, make sure you give your map a compass rose, so the people who use it know which direction they’re heading in!

Hand drawn map by Ada Grazia Cowan.

Maps Activity Book. Copyright © 2013 by Aleksandra and Daniel Mizielińki. Reproduced by permission of the publisher, Candlewick Press, Somerville, MA.

Maps. Text and illustrations copyright © 2012 by Aleksandra and Daniel Mizielińki. Translation copyright © 2013 by the Templar Company Ltd. Reproduced by permission of the publisher, Candlewick Press, Somerville, MA.

Crafty Kids: How to Make Beaded Key Fobs

The title of this craft begs the questions: what exactly is a fob, and why on earth would any kid want to make one (aside from the fact, of course, that they’re really pretty)?

Traditionally—meaning, in the late 19th century—a fob was a decorative chain that attached your pocket watch to your person. Since not many folks wear pocket watches anymore, the craft is reimagined here by our friends at Crafting Community as a decoration for a key. And as every kid knows, getting your own key to the house is an enormous rite of passage, one that symbolizes a surge in responsibility as well as a parent’s recognition of it.

Why make a key fob? To celebrate that oh-so-important key and make it look as important as it really is. Not to mention, help your kid find it in her cluttered backpack!

What you’ll need:

Plastic lacing
Scissors
Metal clips
Pony beads in assorted colors

1. Start with about 6 feet of plastic lacing, fold it in half, and put it on a metal clip.

2. Thread your first bead onto one end of the cord, then thread the other end of the cord through the opposite side of the bead.

3. Begin your design by adding the next row of beads. To do this, slip on 2 beads to the right half of the lacing and then thread the left side of lacing through both beads.

4. Continue to increase or decrease by 1 bead each row until your design takes shape. Once your design is finished, make a knot and hide the little ends under the last row of beads. Now it’s time to hook on that key!

Crafty Kids: How to Make a Woven Yarn God’s Eye

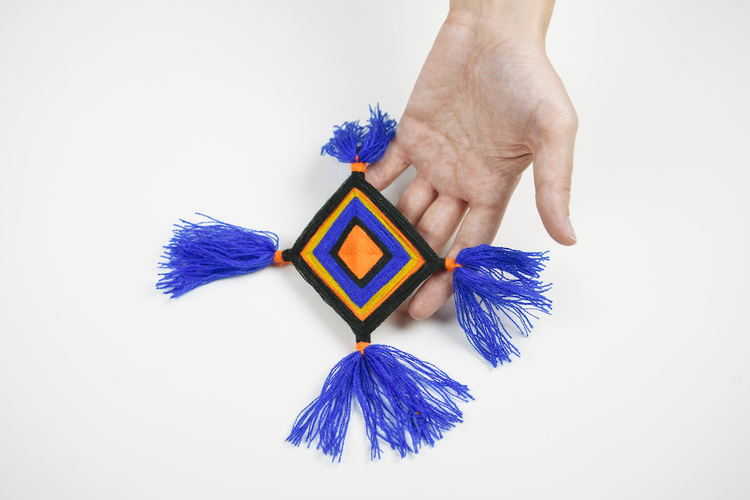
Woven Yarn God's Eye

The ojo de Dios (Spanish for “eye of God”) is a folk toy with origins among the Huichol Indians of the Sierra Madre. The four points of the crossed sticks are said to represent the elements of earth, air, water, and fire; the finished eye, replete with alternating stripes of yarn, is meant to offer health, fortune, and long life.

Extremely simple to put together, this bright, festive craft from our friends at Crafting Community forms the base for a great crib mobile—something for an older sibling to make for the new baby in the house. It’s also a super entry point for talking to kids about American history—and for parents to learn a little something, too.

What you’ll need:

  • Two sticks of equal length
  • Brightly colored yarn in 3 or 4 color
  • Scissors

1. Grab two sticks and tie them together in the middle with the end of your ball of yarn. Twist the sticks to form a ‘+’.


2. Wrapping in a clockwise direction, wind your yarn over and around 1, then 2, then 3, then 4. (See image at right for technique).

3. To switch up your colors, simply snip the yarn you’re working with and tie on a new color. Trim the excess and continue wrapping.

4. To finish your god’s eye, top knot your yarn around your final stick twice. Trim the excess yarn and you’re done!

To add tassels:

1. Loop yarn around your fingers 15x

2. Thread another piece of yarn through your loop and make a knot with long tails. Cut the end of your yarn loop to create fringe.

3. Tie your tassel on, knotting it to your gods eye on the back side.

4. Wrap one side of the tails around the arm of your gods eye several times, then knot it to the other tail to finish.

Crafty Kids: Floating Container Ship

By Chris Barnardo

A super quick and easy model to put together, this floating container ship is made from a couple of old dishwasher or washing machine liquid bottles, along with a few other bits and pieces. There’s plenty of fun to be had both making and playing with it—kids love naming their ship, writing its name on it in permanent marker, and then sailing it across the great Bath (or Swimming Pool) Ocean.

What you’ll need:

  • Glue gun
  • Marker
  • Craft knife
  • Large dishwasher soap bottle
  • Small dishwasher soap bottle
  • Piece of cardboard
  • A few small stones
  • Shower gel bottle
  • Milk carton cap
  • Liquid detergent bottle cap
  • Yogurt cup base

1.     To make a floating ship, you’ll need a plastic bottle for the hull, and another, smaller bottle for the cabin. Mark lines around the bottles following the diagram above, using a permanent marker. Use your craft knife to cut.

2.     Place the hull part upside down on a piece of thick cardboard and draw around it with a marker.

3.     Cut out the deck slightly inside the line so that the cardboard will just fit inside the hull.

4.     Cut some small supports out of cardboard, at the right height to allow the deck to be slightly recessed. Glue these to the underside of the deck. Glue around the edge of the deck and slide in. Glue the milk bottle top into the detergent bottle opening. To prevent your ship from being top heavy, glue a few small stones inside the hull before you glue the deck into position.

5.     With deck in place, glue around its seams to make sure it’s waterproof.

6.     Glue the cabin upside down to the deck, then glue the yogurt cup end to the deck.

7.     Cut the end off a shower gel pack and glue to the front of the cabin to make the bridge. Glue a detergent bottle top to the top of the bridge to make a funnel.

8.     Decorate with marker, then get ready to launch your ship!

Excerpted from Made with Dad by Chris Barnardo, (c) 2015 Skyhorse Publishing.

Crafty Kids: Straw Rockets

This sweet, summer-celebratory craft from our friends at Kiwi Crate is great fun when you’re wrangling a whole group of neighborhood kids who could use a little (but not a lot!) of structured activity. It’s super quick and easy to pull together, and gets (and keeps) the whole gang outside.

What you’ll need:

  • Several pieces of origami paper, or any other square-shaped paper
  • Straws (fat ones from bubble tea stores work best)
  • Tape (used here: long pieces of metallic tape to seal the side, as well as shorter tape squares to close the top)
  • Curling ribbon (optional)

1. With the “nice” side of the paper facing up, place a long strip of tape, sticky side down, along one edge of the paper.  Half the tape should hang over the edge of the paper.

2. Flip the paper over. Starting opposite the tape, roll the paper loosely around the straw.  Seal with tape to make a tube.

3. Fold one end of the tube over and tape it closed. Make sure the tube is completely sealed so no air can get out.

4. If you’d like, decorate your rocket by taping on pieces of ribbon.

5. Blow into the straw to launch your rocket. Blast off!

Summer Entertainment for Kids – Free Printables

Once the final school bell of the year rings, keeping the kids engaged and occupied for the next three months lies solely on you and whatever childcare you’ve lined up for the summer. Fear not! We’ve found 6 totally free, downloadable printables, guaranteed to be welcomed diversions on more than one rainy day, long car ride or when you simply need a moment to yourself.

ABC Practice: This letter tracing sheet will keep beginning writers sharp and help ABC newbies learn and practice their letters before the start of preschool or kindergarten. The clean, watermark-free file is also nice to frame as artwork or at least to keep in the baby book. (via Back House White Shutters)

Screen Shot 2014-07-11 at 12.36.04 PM

Travel Bingo: There are six of these save-your-sanity bingo cards that are beyond perfect for the family road trip. They have pictures along with the words, so even little ones can play. You can print them on card stock and have them laminated or place each in a page protector. As kids find an object on the card, they can mark it by placing a sticker on it or use a dry erase marker. (via Simple As That)

Screen Shot 2014-07-11 at 12.44.56 PM


Coloring Pages: Take your pick, depending on your audience – coloring pages from Disney’s much adored Frozen movie or super cool color-by-number sheets. If your kids are as obsessed with Disney’s Frozen as much as ours are, they’ll melt to pieces over these fun coloring pages. (via The Kids Coloring Pages)

via Kids Coloring Pages

Reading with Kids: For older kids or for those who like a bit more of a challenge, Reading with Kids provides dozens of color-by-number and color-by-letter printables. Simply use the code at the bottom of each pages to determine how to color each space. A picture is revealed when all the spaces are colored. (via Reading with Kids)

Screen Shot 2014-07-11 at 12.48.59 PM

Dr. Seuss Word Search: Word searches are fun, attention-grabbing and just the right activity to bring to a restaurant, on a road trip or as a quiet activity for rest (in lieu of nap) time. Here’s a cute word search with words from the popular author. If you’d rather make your own, providing the words and controlling the difficulty level, check out Discovery Education’s Puzzlemaker. (via Jinxy Kids)

Screen Shot 2014-07-11 at 12.59.10 PM

For more great printables, including finds to keep your family entertained, organized and sharp, check out our Pinterest Printables Board. You, your kids and your sitter will be glad you took the time to download a few sanity savers! 

Let’s Hear It For the Red, White and Blue!

The 4th of July is nearly upon us – get the party started with fun treats and decorations that’ll pump up the patriotism at your house. All you need for a fantastic July 4th BBQ is good company, good food and these fun, festive decorations and sweet treats.

julia-Kid with flag - 4th of July


Red, White and Blueberry Yogurt Popsicles
No food coloring or added sugar in these patriotic treats. They are made with blueberries and raspberries or strawberries and Greek yogurt for the delicious white stripes. (via The View from Great Island)

the view from g island 2

July 4th Cake Toppers
Free printable cake toppers take the all-American Rice Crispy square or any cake, brownie or cupcake up an impressive notch. (via Kara’s Party Ideas)

1

DIY Rocket Garland
Rocket poppers are a fun craft for the kids and are great fun when filled with confetti or make an adorable decoration when hung together as a festive garland. (via Simplified Bee)

1

Firecracker Favors
Adorable candy-filled firecrackers make a great centerpiece and a simple take-home for your guests. (via Crafts Unleashed)

via Crafts Unleashed

Patriotic Silverware Holders
Spark up your tabletop with silverware holders made from craft supplies and a free printable. (via Lil Luna)

Screen Shot 2014-07-02 at 12.08.43 PM

What other crafts and treats are you serving up this 4th of July? Share them with us below.

Yummy Summer Treats to Make With Kids

Before you open a box of popsicles or round up the kids for a trip to get ice cream, consider surprising them with a summer treat they can help create. Kids love to help in the kitchen, and everyone loves a summery treat to share on a hot afternoon or at the end of a long summer day. These delicious desserts make the most of summer’s fresh fruit– berries, watermelon, and cherries – and ingredients you likely already have in your pantry or can easily pick up on your way home. They are so simple to make, we can hardly call some of them recipes.

julia-Kid eating giant heart made of bread


The World’s Easiest Pudding
Choose a healthy packaged pudding cup (or make your own) and scoop it into a waffle bowl. Top with berries. Voila! (via A Dose of Pretty)

via A Dose of Pretty

Watermelon Frosty
Add 2 1/4 cups frozen watermelon cubes
 (freeze the night before), 1/2+ cup water, 2 tbsp maple syrup, 1 large lemon, squeezed (lime juice also works very well! use 2 limes), and 1 fresh banana to a blender. Blend. Add more water as needed, but as  little liquid as possible to keep your frosty thick and frosty. Garnish with frozen watermelon/rind slices. For a grown-up version, turn this super smoothie into a margarita by adding tequila! (via Lunchbox Bunch)

via Lunchbox Bunch

Super Easy Strawberry Shortcake
Shortcakes, strawberries and whipped cream, oh my! Dip tops and sides of biscuits in margarine (or butter), dip into sugar
. Place onto un-greased cookie sheet and bake for 13 to 17 minutes. Cool for 5 minutes
. Combine strawberries and sugar in a mixing bowl, set aside. 
Beat whipping cream, sugar and vanilla until soft peaks form
. Split biscuits, layer on cream and strawberries
. (via Tammilee Tips)

Screen Shot 2014-06-30 at 2.12.56 PM

Pretzel Nutella Ice Cream Sandwich Bites
You can whip up these mini sweet and salty sandwiches with little more than a bag of pretzels, ice cream and a jar of nutella. Place a sheet of wax paper on a small freezer-safe plate or pan. Place half of the pretzels on the wax paper. Smear some Nutella on each of the pretzels. Working quickly, top with about a teaspoon of ice cream and place a plain pretzel on top. Freeze for about an hour, or until they’re solid. Working quickly, smear a little Nutella on one end of each sandwich and dip in crushed hazelnuts. You may want to return these to the freezer for a while to re-harden them. Or you can eat them right away. (via Tasty Kitchen)

via Tasty Kitchen

Cherry Pie Bars
A little more work, this recipe is a good one to tackle with older kids. These bars would be  sweet to pack for a picnic or bring to a BBQ. Preheat oven to 350 degrees. In a mixing bowl, whisk together flour, baking powder and salt, set aside. In a separate bowl, whip together butter and sugar until pale and fluffy. Mix in eggs one at a time, then blend in vanilla and almond extracts. With mixer set on low speed, slowly add in dry ingredients and mix until combined. Reserve and set aside 1 1/2 cups batter then spread remaining evenly into prepared baking dish. Top with cherry pie filling spreading into an even layer. Dollop small spoonfuls of the remaining batter evenly over top. Bake in preheated oven about 30 – 37 minutes. (via Cooking Classy)

Screen Shot 2014-06-30 at 2.18.42 PM

These treats are the perfect way to make a play date extra fun or to leave with the sitter for special surprise to enjoy with the kids while you’re away.