DIY Parents: How to Organize the Craft Supplies

There’s a distinct downside to having art- and craft-loving kids. Namely: all that art- and craft-making stuff. Not to mention, the pile-up of the arts and crafts themselves. Find yourself vacuuming up perfectly good beads because you just can’t stand the never-ending sprawl of them across the living room floor? Or secretly tossing projects-in-process into the trash, then pretending you have no idea what became of them when your kid asks? Then you’ve clearly hit your craft-clutter limit.

Never fear, you can take this matter firmly into your own hands. For tips on how to make sense of your mess, we turned to Mabel’s Labels founder (and mom of six), Julie Cole—a woman who knows more than possibly anyone about getting and staying organized.

Toss it. Before you can even begin to tidy up, you first need to assess what should stay and what absolutely needs to go. Markers that don’t work anymore, paint brushes that have lost their bristles, yellowing wads of craft paper—all this should be sent straight to the trashcan. Also remember that not every piece of art your kid makes is created equal. Assess each one honestly, then hold on to those that really mean something to you and your family, and the ones that exhibit that special kid-art-genius flair.

Sort it. Set aside a little time each night or every weekend to pick through the crafty “keep” pile. This is the time to find the stray colored pencils, the paint tubes that wound up under the bathroom sink, the buttons that somehow got mixed in with the souvenir seashells, and put them all to rights—each kind of thing in its own designated pile. You might find more things that need to be deaccessioned. You will certainly discover which items you’ll need to replace—and which you never want to buy again (glitter, anyone? We didn’t think so).

Set it up. If you didn’t have a dedicated crafting area before, designate one now. Or, reclaim an established area with force and conviction. Even apartment dwellers can eek out a little room on the coffee table that’s just for making things, and one shelf (or three) that’s just for craft storage. Maybe your über-crafty kid wants to turn over part of his or her room to the endeavor. In which case, you can reassign closet, desk, and shelf space there. The real work? Making sure that the craft space stays a craft space and that supplies don’t leak out all over the rest of the house.

Stash it. Now it’s time to put everything away. For the big stuff, like rolls of paper and ribbon, and paint and crayon sets, pick up or repurpose some bright, colorful plastic bins that will fit neatly on your shelves. Stash smaller items like beads, buttons, rubber bands, googly eyes, and pipe cleaners in lidded glass jars. Frequently-used items like markers and pencils and even paintbrushes can be stashed in table-top canisters. Give all your bins and containers a home within easy reach of your smallest crafter. And be sure to label everything clearly, for easy cleanup today and hopefully forever!

Photographs courtesy of Mabel’s Labels

Crafty Kids: How to Make an Up-cycled Birdfeeder

The weather’s warm and the birds are fitting all through the neighborhood! Turn your window or fire escape into a bird-viewing station by luring in some feathered friends to nosh at this seed feeder, made from an empty snack container. This easy, cheerful craft comes to us from Project Kid by Amanda Kingloff. When you’re done with it, you might just be inspired to make a dozen more!

What you’ll need:

  • 1 small nut can (about 3 inches in diameter)
  • Scissors
  • 1 6-inch stick
  • Tacky glue
  • Outdoor craft paint
  • 1-inch foam brush
  • Twine
  • 2 wooden beads
1. First, empty the can: Peel the foil cover halfway back and remove the nuts. Cut off the unattached foil, then cut a 1⁄4-inch slit vertically in the center of the remaining foil and fold the edges down on both sides to create a wide V shape. (We want the birds to enjoy their meal without injury.)


2. To create the perch, punch a small hole near the bottom of the attached foil with the end of the stick and push the stick through. Before the stick hits the back of the can, apply glue to the bottom edge of the stick and let it rest standing up in the bottom, back edge of the can until dry.

3. Paint the outside of the can and let it dry. Add a second coat if necessary.


4. Cut a piece of twine that’s 5 feet long, plus as much as you’d like to use to hang the feeder. Find the center point of your length of twine and place the bottom edge of the feeder on it. Wrap each end of the twine around the can about three times, until both ends are once again at the top. Tie a knot, thread the beads over the two ends of the twine, and hang outside. Voila! You’re done. And the birds will surely thank you.


DIY Parents: Getting Ready for the Big Move…Before You Move

By Smith Banfield

Moving into a new apartment can be overwhelmingly stressful—especially when you’ve add kids to the already chaotic mix. To figure out how to mitigate some of the horror, we asked styling consultant Smith Banfield of Clear Space in New York City for her top survival tips.

1. When you move, you’re stepping into the future—but not everything you own needs to go there with you, because most of that stuff is from your past. Before you just empty drawers into packing boxes, take some time to go through everything and really assess if you have to bring it along into your new, and doubtless limited, space. That having been said, don’t make those decisions for anyone but yourself. My mother was really harsh with me about things she’d bought me that were expensive and she thought we should keep, but ultimately, she decided what was important to me as a child rather than letting me decide. So, don’t force your children to keep anything they don’t want. If you think it’s worth saving, donate it to another family that can’t afford it. And if your child really feels she needs to hang on to something, let her make that decision.

2.  Categorize things before you move! There are boxes that you know will live in certain rooms, so you can transfer things from the old kitchen to the new kitchen; if you have comparable space in the new place, you can even transfer things from the top kitchen drawer, the middle kitchen drawer, and so on—mark all your boxes clearly with the room and its place in the room. You may need to modify this if you’re moving into a smaller space. And you should definitely throw away anything item you wouldn’t purchase tomorrow if you found it in its current condition at a garage sale—like a disintegrating spatula. Curate! So many people who say, “I’ll deal with it later,” then they wind up with a pile of boxes in a room that soon becomes invisible, and you put a lamp on it. It’s self-sabotaging, when what you really want when you move is to step into a new life, with a clean slate.

3.  Take the time to measure every inch of your new space before you move in, and then take a hard look at the furniture you have, so you don’t move a bulky couch that’s not going to fit through the door—because remember, everything you put on the moving truck increases the cost. What I do is take blue painters tape and tape it down on the floor where I think any object is going to go. If it looks like a tight fit, like the king bed is not going to fit in the bedroom, you can decide to buy a smaller bed. It’s also important to slow down and analyze your space once you’ve actually moved all your stuff into it. Before you do a huge redesign, live in the space for six months, so you and your family will learn your habits in terms of how you use it. I know you want everything to be perfect, but it is a process. That goes for painting the walls, too. You can have your landlord put up a fresh coat of white paint, and then wait and see what the lighting is like at night, or in winter; this avoids the mistake of deciding on a pretty blue for the dining room, only to discover that there’s not a lot of light coming in in December and the blue just looks depressing. It might take an entire year for you to feel like you’re completely settled in. But that’s okay!
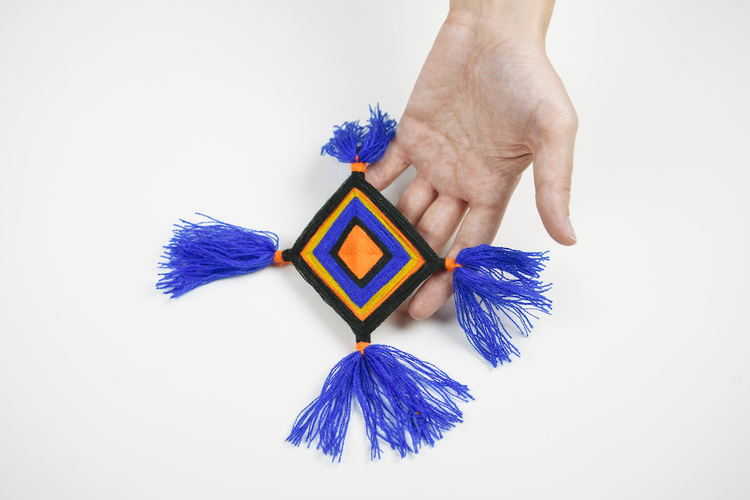
Crafty Kids: How to Make a Woven Yarn God’s Eye

Woven Yarn God's Eye

The ojo de Dios (Spanish for “eye of God”) is a folk toy with origins among the Huichol Indians of the Sierra Madre. The four points of the crossed sticks are said to represent the elements of earth, air, water, and fire; the finished eye, replete with alternating stripes of yarn, is meant to offer health, fortune, and long life.

Extremely simple to put together, this bright, festive craft from our friends at Crafting Community forms the base for a great crib mobile—something for an older sibling to make for the new baby in the house. It’s also a super entry point for talking to kids about American history—and for parents to learn a little something, too.

What you’ll need:

  • Two sticks of equal length
  • Brightly colored yarn in 3 or 4 color
  • Scissors

1. Grab two sticks and tie them together in the middle with the end of your ball of yarn. Twist the sticks to form a ‘+’.


2. Wrapping in a clockwise direction, wind your yarn over and around 1, then 2, then 3, then 4. (See image at right for technique).

3. To switch up your colors, simply snip the yarn you’re working with and tie on a new color. Trim the excess and continue wrapping.

4. To finish your god’s eye, top knot your yarn around your final stick twice. Trim the excess yarn and you’re done!

To add tassels:

1. Loop yarn around your fingers 15x

2. Thread another piece of yarn through your loop and make a knot with long tails. Cut the end of your yarn loop to create fringe.

3. Tie your tassel on, knotting it to your gods eye on the back side.

4. Wrap one side of the tails around the arm of your gods eye several times, then knot it to the other tail to finish.

Donations 101: Give Your Unwanted Stuff a Second Life

Shoes

By Lela Nargi

Late autumn is the time many of us find ourselves cleaning out the drawers and closets. There’s never a bad time to do this—whenever you feel overwhelmed by stuff, then that’s the time for stuff to go—but just before we shutter the doors and windows in anticipation of the cold months ahead, and well in advance of the deluge of all the new stuff that comes along with the holidays, may be a better time than most.

Yes, it can be cathartic to load up industrial strength garbage bags with shredded socks, used up art supplies, the cute little tutus the ballerina in your family utterly dismissed when she switched to hip hop classes. But what about the perfectly good shoes that got no wear? And the stack of pants with nary a stain on them, that your son merely outgrew? And your own hidden closet “gems” that you finally have to admit you will never again don in this lifetime? Rather than relegating all these still-useful things to the landfill, take a moment to consider who else might gain from your happy loss.

“If you are a sample sale junkie and have unworn or gently worn designer clothes or you are a vintage junkie and need to make room for new finds,” professional organizer Smith Banfield recommends checking out what resale retailers might exist near you—like Brooklyn’s Buffalo Exchange. They give you cash or credit for your gently used clothes (adults only) and, says Banfield, ”If they don’t want it, they have a bin nearby to donate your clothing so you don’t have to bring it back home. It doesn’t matter what you paid for any of these items. Make a commitment to leave everything at the store.”

If you think your and your family’s clothes are worth a bundle—if you’ve bought rare and beautiful pieces for everyone in the house and they’re all still in terrific shape—then try a consignment shop. They’ll stick any stuff they think they can sell on their racks, and give you a portion of the proceeds when and if it’s purchased. But, cautions Banfield, this method is “not always worth the effort.” Unless you’ve got some seriously hot ticket items—or your kids’ clothes are exactly right for the season—you might have a long wait before you see any big dollars.

If you’re not interested in getting any cash for your items, and you live in an area that doesn’t fine you for putting big bags of stuff out on the street, Banfield recommends posting a curb alert onto Craig’s List with a good-quality photo of what you’re about to toss. Chances are good someone will show up for it, pronto.

If you’ve got school-age kids, get ready for the onslaught of holiday requests for donations. Coats are always top of list, as are very gently used and new toys, games, and books. All of these items can really go a long way toward making December a lot brighter for kids and families in need.

Still flummoxed about where to unload? Check out donatestuff.com for a national registry of places that accept donations. Then, sit back and enjoy the new, clutter-free you…for a few weeks, at least!

Crafty Kids: Nifty Back-To-School Projects– with Tape!

Duct tape crafts have been hot for the past couple of years because a) they’re easy to put together and b) pretty much every child loves tape! You can help boost the excitement for back-to-school in your kids and tweens with these two fun (and useful) crafts from our friends at Duck Brand Tape.

Chalk Circle Calendar

You will need:

  • Cardstock
  • Scissors
  • Duck brand chalkboard tap
  • Duck tape

1. Make a 1-1/2-inch template for your day-of-the-week circles out of cardstock, then trace the template on the back of the chalkboard tape, 42 times, at cut each circle out.

2. Trace letters for the days of the week on the back of the Duck tape, then cut out and stick one of each to 7 of the circles.

3. Now, piece by piece, stick your calendar to your wall, inside your closet, wherever it’s handy!

Desk Organizer

You will need:

  • 12 empty Duck tape rolls
  • Duck tape
  • Scissors

1. Tape 2 empty Duck tape rolls together to get a double-long tube. Fold over any excess tape. Then, cover the inside of the roll with Duck tape, too. Repeat 5 times.

2. Using thin strips of Duck tape, attach the tubes to make a pyramid shape. Now you’re ready to load your organizer up with all your pens and pencils for the school year!

Keeping the Nursery Cool in Summer

photo via creative commons

PHOTO VIA CREATIVE COMMONS

Even new parents quickly realize that an uncomfortable baby is an unhappy baby. When homes start to heat up in summer, letting young children run around in nothing more than a diaper can keep them comfortable during the day. But nighttime and nap-time coolness requires making a few adjustments to the nursery, to ensure that baby sleeps well.

For starters, block direct sunlight from streaming into the room. This is particularly important if the nursery is on the west side of your home, or otherwise receives direct sunlight for the majority of the day. Hang black out curtains, which will reduce heat transfer from windows.

Another way to reduce the amount of heat coming through is to install specialty sunscreens on the exterior of the nursery windows. This type of screen can block up to 95 percent of sunlight, and can be easily removed and stored when winter comes.

Maximizing airflow is also a must. And while cribs filled with teddy bears, blankets, and crib bumpers might look cute and cozy, all that extra fluff blocks airflow (it can also be a suffocation risk). Instead, choose a crib guard that leaves space for air to move freely into the crib through the rails. And swap out blankets for a lightweight swaddler or sleep sack. Put everything else away.

Also remember that during the summer months, ceiling fans should be set to rotate counter-clockwise. This pushes air straight down to cool the room, rather than pulling it up, to warm it. The hotter it gets, the higher the speed of your fan should be.

Clogged and dirty air ducts can reduce the flow of A/C into the nursery, especially if the room is far from the central unit. Hire a pro at an HVAC company, who can measure airflow coming from vents in the nursery and help determine if a duct cleaning is needed, or if the A/C unit needs servicing.

For more nursery tips, visit Go Mama Go.

Meet the Hanlin-Coopers of Cobble Hill, Brooklyn

The Hanlin-Cooper Family
The Hanlin-Coopers in their newly renovated Cobble Hill living room.

By Lela Nargi

What do two architects want in a NYC apartment? “We were looking for a big loft in downtown Manhattan,” recalls Jennifer Hanlin of the move she and husband Chris Cooper made in the late ‘90s after graduating from Harvard’s Graduate School of Design. “It turned out, that’s only for people on Friends.”

What she and Cooper got was a “teeny-tiny” apartment on Tompkins Square, followed up by a larger space near Gramercy Park that was still too small for the two cribs Hanlin tried to wedge in when she was pregnant with the couple’s now-11-year-old twins, Mia and Felix. So, they plotted a course for Brooklyn. At the time, it offered more room for less money, along with a distinctly family-centric vibe. Nevertheless, “We went kicking and screaming the whole way,” says Cooper.

But how their anti-borough sentiments changed. Having found a unique, high-ceilinged apartment in a 1920s school building in brownstone-lined Cobble Hill, Cooper, an architect at Skidmore, Owings & Merrill, and Hanlin, who runs her own interior design studio, Hanlin Design, have more than settled in. “We’ve become so committed to this neighborhood,” says Cooper. “There’s a real community here, centered around a school and restaurants and markets. It has a suburban aspect in an urban setting.”

Mia rocks out in the bedroom her parents designed for her.
Mia rocks out in the bedroom her parents designed for her. The stairs begind her lead to her “floating nest” of a bed.

For Mia and Felix, that adds up to a lot of recreational possibilities, all within walking distance. “My friends’ houses are close-by, like within five blocks,” says Mia.  “And I love Farmacy—that’s an old-fashioned soda shop that has milkshakes and root beer floats, and if you wear one of their T-shirts when you go in, you get a free egg cream.” The shop has become a favorite of many locals since it opened in an abandoned apothecary in 2010, after its renovation was undertaken—for all the world to see—on the Discovery Channel show Construction Intervention.

Felix is a regular at game shop Brooklyn Strategist, a popular weekend and afterschool haunt for neighborhood boys, especially. To hear Felix describe it, every Friday night features a cut-throat draft for a “Magic: The Gathering” tournament. “It fills up pretty fast,” he says, eyes wide. But the effort is worth it: “You can win Magic cards that you get to keep.” Felix also cites the rare-for-the-neighborhood parking lot that fronts their building as a fortuitous feature, especially in winter: “We can go down there and make snow forts and have snowball fights,” he says.

Hanlin quickly discovered that the neighborhoods surrounding Cobble Hill have everything a design studio could want, resource-wise. “What’s available locally is amazing,” she says. “There are four workshops in Red Hook and the Navy Yard that I use for upholstery, furniture restoration, fabrication of mill-working and built-ins. Right now I’m working with a guy in Greenpoint on a caning project. No one offers that kind of customized craftsmanship in Manhattan anymore; it’s all been pushed to Brooklyn.”

Felix with just some of his collections—and a view out the window of lower Manhattan.

Recently, she and Cooper had cause to use some of these resources on a personal project. This was the renovation of their apartment, which Cooper says is further proof of how dedicated they’ve become to this neighborhood he once feared was “too compact” to feel like home but which he now regards as just right. With the kids growing, he says, “It was important for everyone to have their own space, with its own identity.” For Felix, that meant walls of storage to accommodate his collections of Lego and minerals and old keys. For Mia, a “floating nest” of a loft bed and proximity to the art closet were paramount among her needs. For themselves, Cooper and Hanlin were looking to create a soothing environment that harnessed the copious natural light pouring in from high windows, as well as lots and lots of storage.

They collaborated heavily on the project, which took seven months and shows a style influenced by Japanese aesthetics—everything tidy and tucked-away. Says Cooper, “I came up with the spatial infrastructure and developed the compact organization of the rooms. Jen itemized everything we had and accounted for where it would go.” Hanlin also focused on developing a neutral color palate throughout the space, which twists and turns up and up and eventually, in Felix’s room—a sort of tower that tops the whole space—leads out on to the roof. Cooper continues, “We got rid of almost all our furniture and focused on built-ins and a few carefully placed pieces to set the tone. That allows us to live in a small space and not have it feel small.”

It’s not the first time the two have teamed up on a project. Cooper was senior designer for the new 7 World Trade Center building. Hanlin recommended the artist for the lobby piece: Jenny Holzer, who works largely with LED displays. “A lot of artists were being considered,” says Hanlin. “But some of them had a less New York voice.” Holzer’s scrolling 65′-by-14′ wall of text in the building lobby is all New York. It features a continuous scrawl of poems and prose about the city, by writers as diverse as Walt Whitman and Allen Ginsburg. “It’s just a great piece of public art,” says Cooper.

At the end of a fast-paced day of designing sleek, modern buildings in ever-cacophonous Manhattan, Cooper says it’s a relief to return home to mellow Brooklyn. “I walk a mile from the subway to the house and I find myself thinking, We are so lucky,” he says. “There’s a different pace here, and I like the smell of the nearby harbor, and seeing the seagulls.” He pauses to take a phone call: His downstairs neighbor needs help moving an enormous fish tank. With a genial smile, Cooper pulls on his shoes and leaves to offer his assistance.

hanlin+cooper+family (1)

Photographs by Roy Beeson


The Ultimate Holiday Gift Guide for Babysitters and Nannies

Whatever do you give to the person who takes care of your children? While cold hard cash is always appreciated, it’s nice to also show your gratitude with a personal gift to go along with it. To help you choose something special, we’ve rounded up our favorite holiday gift ideas for nannies and babysitters, including something to fit every budget and taste.

Show her you care enough to have noticed her good taste. Hex Hoop Earrings, $78-$248 via Alexis Russell Design.

Alexis Russell Design
Alexis Russell Design.

For the bookworm, a set of classics that is guaranteed to leave a lasting impression. Jane Austen Set, $225 via Juniper Books.

via Juniper Books
via Juniper Books

A hat makes for a toasty token of a gift. Embellished Beanie, $30 via TopShop. 

via Topshop
via Topshop

An awesome, lightweight, portable and wireless speaker that turns any job into a dance party. Beats Pill, $299.95 via Beats by Dre.

via Beats by Dre
via Beats by Dre

An interior design aficionado will appreciate a little flair for her home. Jonathan Adler Letter Pillow, $124.99 via Bloomingdales.

via Bloomingdales
via Bloomingdales

These shiny vases are right on trend and kind to your budget, too. Ombre Mercury Vases, starting at $29 via West Elm. 

Via West Elm
Via West Elm

A tasty DIY you can create with the kids provides a homemade treat with a personal touch. Homemade Nutella Truffles via Deliciously Yum. 

via Deliciously Yum
via Deliciously Yum

For more great gift ideas for the special sitter or nanny in your life, check out our Pinterest board. The lucky woman who saves your sanity will be glad you did! 

10 DIY Family Costumes for Halloween

Put your DIY skills to good use by copying one of these outstanding Halloween costumes for the whole family. These get-ups are so great, your childless friends will be wishing they had kids, too!

11
Burglars via Instagram
Rapunzel, Flynn Rider and Pascal via Cara Loren Via Cara Loren
Rapunzel, Flynn Rider and Pascal via Cara Loren via Cara Loren
Skeletons Via Parents.com.
Skeletons via Parents.com
Chefs and Lobster in a Pot via Buzzfeed
Milk and Cookies Via Costume Works
Milk and Cookies via Costume Works
Cat in the Hat via Costume Works
Cat in the Hat with Thing 1 and Thing 2 via Costume Works
Flintstones a Life Full of Whimsy
Flintstones via A Life Full of Whimsy
Wizard of Oz Buzzworks
The Wizard of Oz via Costume Works

For more awesome costumes for babies, kids, families and even pets, check out our Halloween Pinterest board!