DIY Families: 5 Home Projects You Can Do with the Kids

When you’ve got a lot of projects to take are of around the house, your first instinct might be to send the kids out of the house on play dates, or into the yard with their toys. But getting your children involved in working around the house presents many great learning opportunities and, when taught correctly and monitored appropriately, can actually help you get your work done faster!

Below are five easy home projects the whole family can get involved in, from our friends at HomeAdvisor.

1. Painting the walls. You can paint the high parts of the walls; your kids can help cover the lower areas. It’s a project most of them will love, and it also gives them a beginner handyperson’s education in undercoats and how to place tape to avoid painting the baseboards. You will need to supervise them throughout the process, but the sense of accomplishment they’ll feel when they actually get to see the completed room painted a whole new color is enormous. If they’re too little to really help, let them show their creativity by painting smiley faces, clouds, flowers, that you’ll paint over later.

2. Clean out the drains. Drains get stopped up over time, but there’s no need to use chemicals to un-clog them, unless you’ve gotten something major stuck down there. Baking soda, salt, and cream of tartar mixed together into a paste is a concoction that’s safe enough for children to use, and strong enough to get the job done. Let the kids pour this mixture down the drain, then follow it up yourself with a kettle full of boiling water you pour down yourself. Let it stand for 30 minutes to an hour, then let your kids run some fresh sold water through the drain to finish up.

3. Give the mailbox a makeover. Over time, your mailbox can take a beating. This is a great project to get your kids involved in. Wash the mailbox with sponges, water, and mild soap to remove all debris. Then decide: does the box simply need a fresh coat of paint? A new house number? Decorations like flowers or flags? Let everyone in the family have a say—and a hand in making your designs come to life.

4. Plant a container garden. Kids love to get down in the dirt, so why not redirect that enjoyment towards something with an actual purpose? They can create holes for young plants and seedlings, get them situated, and water them in. You can also let them choose some of their favorite fruits and vegetables to plant in the garden—they’ll be so excited to see the plants they’ve chosen shoot up and get bigger day by day.

5. Get them involved in overall house-cleaning. While this might seem like a big chore, you can help kids find a fun way to get involved in the process. Show them how to swish a feather duster around with flair, and they can dust off your end tables and other low-lying areas. You can also make tidying their rooms into a game: how fast can they stack the blocks, or how many dolls will fit in one cubby? Not only does this help you (a little), it helps your children learn good practices that will benefit them through their whole lives.

Crafty Kids: How to Make Maps of Your Neighborhood–and Your Imagination

Children love maps. The graphic imagery of even the simplest charts can give them lots to feast their eyes upon, and to dream about. But maps also help them make sense of the world around them—something grownups, who’ve committed thousands of routes to memory, often take for granted.

The warming weather provides the perfect opportunity to accompany your budding cartographer out into the neighborhood, to sketch up the way to a friend’s house, or the playground, or just once around the block. Some kids prefer to draw places they see in their imagination. Either way, inspired by the book Mapsby Aleksandra and Daniel Mizieliński, and featuring images from the accompanying Maps Activity Book, here we offer a primer in the ancient art of map making.

What you’ll need:

  • Writing implements—pencils and colored pencils, markers, pastels
  • Paper—either a printout of one of the templates below, or plain paper of your choosing

1.     Decide what you want to make a map of. Will it be a map of a place you know already—like your room or your block? Will it be a map of someplace big, like the whole Earth or a made-up planet? Or will it be a map of someplace small, like your school or your neighborhood? Take a tour of the place—if you can—to get the lay of the land.

2.     Map out your map. With light pencil or chalk marks, rough out where everything on your map will go: buildings, streets, parks, trees, oceans, cars—whatever you fancy! Then work on making your map more permanent, with firmer marks and color and details like windows on buildings, or waves on the sea, or leaves on your trees.

3.     Label the things you’ve drawn on your map: Nico’s house, the Indian Ocean, Christmas Street. Then, make a legend. A legend tells things like how many inches equal a mile, what the capital of your country is, and what the native language is. If you like, you can also draw pictures of local birds and flowers, and the people (or aliens!) who live here.

4.     Finally, make sure you give your map a compass rose, so the people who use it know which direction they’re heading in!

Hand drawn map by Ada Grazia Cowan.

Maps Activity Book. Copyright © 2013 by Aleksandra and Daniel Mizielińki. Reproduced by permission of the publisher, Candlewick Press, Somerville, MA.

Maps. Text and illustrations copyright © 2012 by Aleksandra and Daniel Mizielińki. Translation copyright © 2013 by the Templar Company Ltd. Reproduced by permission of the publisher, Candlewick Press, Somerville, MA.

Crafty Kids: How to Make a Beaded Woven Plant Hanger

It’s spring, which means it’s a great time to bring some nature inside for you and the kids to nurture and enjoy. These easy decorative plant hangers are easy to bead together—think of them as macramé without the fuss. And they serve a three-fold purpose: they provide a fun craft for an otherwise dull afternoon; they enliven boring terra cotta pots; and they get plants up off the floor and other easy-to-reach surfaces where they can be easily knocked over.

These come to us from our friends at Crafting Community and we think you’ll have so much fun making them you won’t be able to stop at just one!

What you’ll need:

  • 2 7-foot lengths of butcher’s twine, or other sturdy rope
  • A yardstick
  • Assorted colorful wood beads
  • Assorted small, low-maintenance plants from your local nursery; cactuses and other succulents make good choices

1.     Stretch out your two pieces of twine together, fold them in half, and knot them together in the center, 2 inches from the top of your loop. Line them up as pictured on the yardstick, splitting the 4 strands into 2 groups: AB and CD

2.     Add a few beads to the strands in each group, then secure group AB with a knot 17 inches down from your top knot; repeat for group CD, making sure the knots are even.

3.     Four inches below your last set of knots, knot B & C together, and A & D together. Again, make sure the knots are even.

4.     Repeat step 3, knotting strands from opposite groups together.

5.     Two inches below your last pair of knots, knot all 4 strands together.

6.     Test out your pot in your hanger, making any adjustments to knots that may be necessary.

.     Find a sunny window and display!

Crafty Kids: How to Make Beaded Key Fobs

The title of this craft begs the questions: what exactly is a fob, and why on earth would any kid want to make one (aside from the fact, of course, that they’re really pretty)?

Traditionally—meaning, in the late 19th century—a fob was a decorative chain that attached your pocket watch to your person. Since not many folks wear pocket watches anymore, the craft is reimagined here by our friends at Crafting Community as a decoration for a key. And as every kid knows, getting your own key to the house is an enormous rite of passage, one that symbolizes a surge in responsibility as well as a parent’s recognition of it.

Why make a key fob? To celebrate that oh-so-important key and make it look as important as it really is. Not to mention, help your kid find it in her cluttered backpack!

What you’ll need:

Plastic lacing
Scissors
Metal clips
Pony beads in assorted colors

1. Start with about 6 feet of plastic lacing, fold it in half, and put it on a metal clip.

2. Thread your first bead onto one end of the cord, then thread the other end of the cord through the opposite side of the bead.

3. Begin your design by adding the next row of beads. To do this, slip on 2 beads to the right half of the lacing and then thread the left side of lacing through both beads.

4. Continue to increase or decrease by 1 bead each row until your design takes shape. Once your design is finished, make a knot and hide the little ends under the last row of beads. Now it’s time to hook on that key!

Crafty Kids: How to Make a Woven Yarn God’s Eye

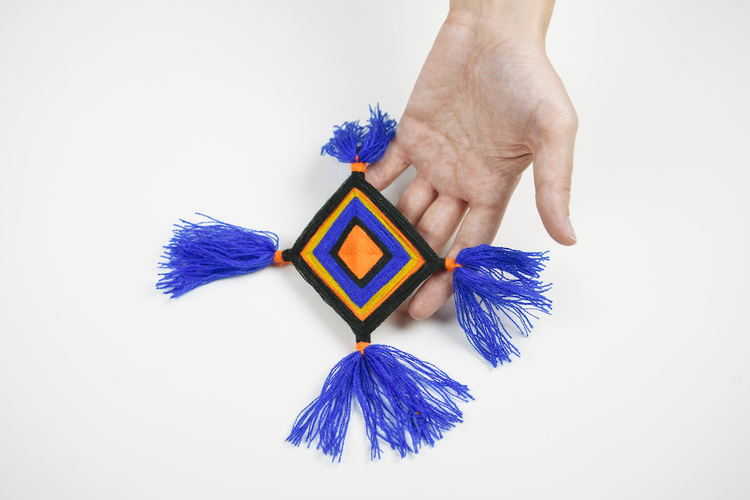
Woven Yarn God's Eye

The ojo de Dios (Spanish for “eye of God”) is a folk toy with origins among the Huichol Indians of the Sierra Madre. The four points of the crossed sticks are said to represent the elements of earth, air, water, and fire; the finished eye, replete with alternating stripes of yarn, is meant to offer health, fortune, and long life.

Extremely simple to put together, this bright, festive craft from our friends at Crafting Community forms the base for a great crib mobile—something for an older sibling to make for the new baby in the house. It’s also a super entry point for talking to kids about American history—and for parents to learn a little something, too.

What you’ll need:

  • Two sticks of equal length
  • Brightly colored yarn in 3 or 4 color
  • Scissors

1. Grab two sticks and tie them together in the middle with the end of your ball of yarn. Twist the sticks to form a ‘+’.


2. Wrapping in a clockwise direction, wind your yarn over and around 1, then 2, then 3, then 4. (See image at right for technique).

3. To switch up your colors, simply snip the yarn you’re working with and tie on a new color. Trim the excess and continue wrapping.

4. To finish your god’s eye, top knot your yarn around your final stick twice. Trim the excess yarn and you’re done!

To add tassels:

1. Loop yarn around your fingers 15x

2. Thread another piece of yarn through your loop and make a knot with long tails. Cut the end of your yarn loop to create fringe.

3. Tie your tassel on, knotting it to your gods eye on the back side.

4. Wrap one side of the tails around the arm of your gods eye several times, then knot it to the other tail to finish.

Crafty Kids: Floating Container Ship

By Chris Barnardo

A super quick and easy model to put together, this floating container ship is made from a couple of old dishwasher or washing machine liquid bottles, along with a few other bits and pieces. There’s plenty of fun to be had both making and playing with it—kids love naming their ship, writing its name on it in permanent marker, and then sailing it across the great Bath (or Swimming Pool) Ocean.

What you’ll need:

  • Glue gun
  • Marker
  • Craft knife
  • Large dishwasher soap bottle
  • Small dishwasher soap bottle
  • Piece of cardboard
  • A few small stones
  • Shower gel bottle
  • Milk carton cap
  • Liquid detergent bottle cap
  • Yogurt cup base

1.     To make a floating ship, you’ll need a plastic bottle for the hull, and another, smaller bottle for the cabin. Mark lines around the bottles following the diagram above, using a permanent marker. Use your craft knife to cut.

2.     Place the hull part upside down on a piece of thick cardboard and draw around it with a marker.

3.     Cut out the deck slightly inside the line so that the cardboard will just fit inside the hull.

4.     Cut some small supports out of cardboard, at the right height to allow the deck to be slightly recessed. Glue these to the underside of the deck. Glue around the edge of the deck and slide in. Glue the milk bottle top into the detergent bottle opening. To prevent your ship from being top heavy, glue a few small stones inside the hull before you glue the deck into position.

5.     With deck in place, glue around its seams to make sure it’s waterproof.

6.     Glue the cabin upside down to the deck, then glue the yogurt cup end to the deck.

7.     Cut the end off a shower gel pack and glue to the front of the cabin to make the bridge. Glue a detergent bottle top to the top of the bridge to make a funnel.

8.     Decorate with marker, then get ready to launch your ship!

Excerpted from Made with Dad by Chris Barnardo, (c) 2015 Skyhorse Publishing.

Crafty Kids: Nifty Back-To-School Projects– with Tape!

Duct tape crafts have been hot for the past couple of years because a) they’re easy to put together and b) pretty much every child loves tape! You can help boost the excitement for back-to-school in your kids and tweens with these two fun (and useful) crafts from our friends at Duck Brand Tape.

Chalk Circle Calendar

You will need:

  • Cardstock
  • Scissors
  • Duck brand chalkboard tap
  • Duck tape

1. Make a 1-1/2-inch template for your day-of-the-week circles out of cardstock, then trace the template on the back of the chalkboard tape, 42 times, at cut each circle out.

2. Trace letters for the days of the week on the back of the Duck tape, then cut out and stick one of each to 7 of the circles.

3. Now, piece by piece, stick your calendar to your wall, inside your closet, wherever it’s handy!

Desk Organizer

You will need:

  • 12 empty Duck tape rolls
  • Duck tape
  • Scissors

1. Tape 2 empty Duck tape rolls together to get a double-long tube. Fold over any excess tape. Then, cover the inside of the roll with Duck tape, too. Repeat 5 times.

2. Using thin strips of Duck tape, attach the tubes to make a pyramid shape. Now you’re ready to load your organizer up with all your pens and pencils for the school year!

Crafty Kids: Straw Rockets

This sweet, summer-celebratory craft from our friends at Kiwi Crate is great fun when you’re wrangling a whole group of neighborhood kids who could use a little (but not a lot!) of structured activity. It’s super quick and easy to pull together, and gets (and keeps) the whole gang outside.

What you’ll need:

  • Several pieces of origami paper, or any other square-shaped paper
  • Straws (fat ones from bubble tea stores work best)
  • Tape (used here: long pieces of metallic tape to seal the side, as well as shorter tape squares to close the top)
  • Curling ribbon (optional)

1. With the “nice” side of the paper facing up, place a long strip of tape, sticky side down, along one edge of the paper.  Half the tape should hang over the edge of the paper.

2. Flip the paper over. Starting opposite the tape, roll the paper loosely around the straw.  Seal with tape to make a tube.

3. Fold one end of the tube over and tape it closed. Make sure the tube is completely sealed so no air can get out.

4. If you’d like, decorate your rocket by taping on pieces of ribbon.

5. Blow into the straw to launch your rocket. Blast off!

4 Easy DIY Projects for Parents & Kids

Contribution by Andrea Davis, Home Advisor

Finding projects to do around the house and yard with your kids is a great way to engage and teach your children. When choosing projects, it is important to consider two things: whether it requires adult supervision and if it engages or intrigues your kids. You want a project that awes and teaches them. Here are some fun projects that get work done around the house and keep your child entertained at the same time.

Paint a Room Together
Kids love to finger paint and work with paintbrushes on paper, so why not give them a canvas like a wall in a room? You can teach them the proper way to move a roller up and down, or you can let them go crazy—to a point—on a wall. Laying down plastic sheets on the floor and painter’s tape over the molding and baseboards will protect them from getting stained or needing a new coat of paint. This will also allot your child the opportunity to feel like they contributed to a project in the house, even if you might have to do a little repainting later.

Grow a Vegetable Garden
Growing an easy vegetable garden is a fun and simple thing to do no matter where you live. If you do not have room in your yard, you can buy a large pot and fill it with soil. There are plenty of vegetable types that will grow in pots. Carrots, bush beans, herbs and radishes are all easy vegetables to grow nearly anywhere. Have your kids plant the seeds and then instruct them on the watering schedule. Once the vegetables are ready to harvest, make sure to cook them up and let your kids take pride in the vegetables they grew.

Vegetable pots copy

Install Stepping Stones in the Backyard
Making stepping stones is a great project to do with kids, and it adds an artistic flare to backyard gardens, patios or walkways. The creativity with this project is unlimited as you can make your own molds with old pans, wood or just about anything that will aide in creating a stone two inches thick. Use ready-mix concrete or mortar and a 40-pound bag will make three to five stones, so plan accordingly.

While you do the prep work of mixing the concrete, have the kids find decorative objects such as beads, pebbles, old marbles or anything else hard and decorative. When the concrete is wet, the kids can add the decorative items. It will take about 48 hours for the concrete to set and then you can remove it from the mold and install it where you choose.

Stepping stones

Plant Solar Lights
Adding solar lights to your garden, walkways or lawn perimeter is simple, fun and creative. Solar lights come in a wide range of styles, anything from basic lights to whimsical creatures. The lights are also supremely easy to install, and your kids can enjoy staking them in whatever location you, or they, choose. Make sure and take them out to see the lights coming on at night. Some tips for installing solar lights to get the most out of them are as follows:

  • Avoid putting them in places where they could be obstructions.
  • Put them in places to highlight a feature, such as a garden or pathway.
  • Make sure to put them in places that maximize sunlight.
  • You can also use the opportunity to teach your kids about green outdoor lighting.

Solar lights

These four projects will require some initial prep work and instructions, but once underway, they should occupy children without much hands-on help from adults.

Andrea Davis is the editor for HomeAdvisor, which helps homeowners find home improvement professionals in their area at no charge to ensure the best service in the shortest amount of time. 

10 Family Activities for a Sweet Summer

For most of us, summer provides a less restrictive schedule with a little more time to spare. There are no school bells to beat, carpools to shuffle, homework to deal with or early bedtimes to make. Take advantage of some of the extra time and freedom, even if it’s just having a longer evening thanks to Daylight Savings Time, by enjoying these top 10 summer activities to do with your family. You’ll be glad you did!

blog1

  1. Attend a baseball game.
    Whether it’s a MLB or a little league game, nothing says summer quite like rooting for the home team at a ballgame. Grab a few hot dogs for the kids and find a spot on the bleachers… even if your little ones are too young to last more than a few innings.
  2. Splash with friends at a pool party.
    If you don’t have a friend’s pool to crash, find a local public pool or private swim club and arrange to have a few friends and their kids gather for a fun afternoon in the water.
  3. Throw a BBQ.
    You don’t need a backyard to host an outdoor summer BBQ. A park with accessible grills or a spot for you to bring your own will work just as well. Check out our Pinterest board, Party Food for fun outdoor dishes to share.
  4. See the stars.
    Loosen the reigns and let your kids stay up late enough to see the night sky. Pack a blanket, load up the car and find a spot dark enough to see for miles.
  5. Get away without the kids!
    No matter how much you cherish the extra hours with your kids during summer vacation, everyone needs a break from each other. Log onto UrbanSitter to find a sitter who will stay the night, or better yet the weekend. You don’t need to spend a fortune or go far to rejuvenate and recharge.
  6. Enjoy an outdoor concert.
    Even families with infants can manage and appreciate a concert in the park. Kids will love camping out on a blanket and listening to the music. Just be sure to bring snacks.
  7. Get wet!
    Come summer, you gotta hit the water. Find a local spot to rent a paddle boat, tube down a lazy river or get drenched at a water or kids splash park.
  8. Go camping.
    Our post last summer on camping hot spots was a reader favorite for good reason. Camping is perfect for families! Check out our post for super family-friendly sites, coast to coast. If packing up the car and hauling your kids to the woods seems like a daunting task, pitch a tent in the backyard for a slumber party under the stars.
  9. Get together with school friends.
    Back to school transitions will be easier if there are familiar faces to share the new routine. Take the time now to schedule play dates with school friends and host an afternoon at your place for your child to meet new friends who will be together in the fall.
  10. Have a picnic. A picnic is the perfect way to enjoy a relaxing afternoon with your family, and knock out dinner, too. We have just the menu for you to do it right and with little effort.

Before the hectic routine of the school year starts again, take the time to enjoy the season with your family. Sharing these fun, memorable summertime activities helps to build happy memories that will stay with you and your kids a lifetime.

 What’s on your summer to-do list?