By Stephanie Martyn
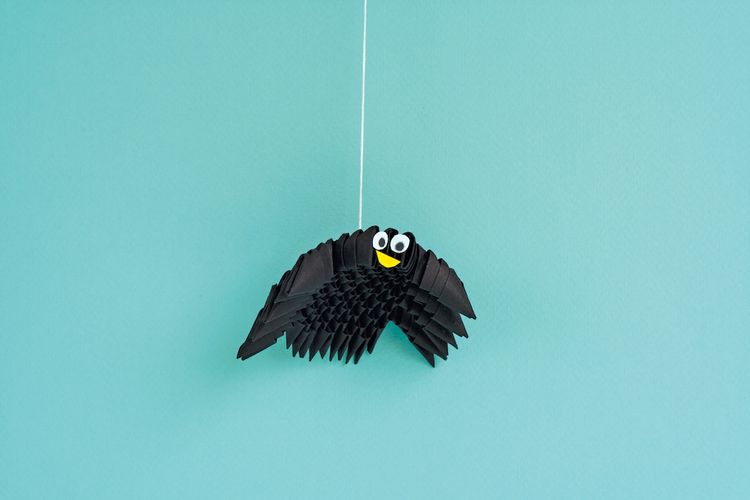
Spiders don’t always have to be creepy! This sweet-looking barnyard arachnid will get lots of friendly pats if you leave him lying around the house when the trick-or-treaters come through.
When complete, this project lies horizontal. Construction starts at the head of the spider, which you’ll see at the bottom of the diagram. You’ll notice the pieces that stick out from the diagram: those are the legs of the spider. These pieces don’t need to be constructed until the main body is completed. Each leg has 3 origami pieces.
What you’ll need:
84 pieces of “Size B” black paper, folded according to the instructions below
All-purpose glue
Scissors
White paper for eyes
Black marker
Hot glue gun
Yellow Paper for mouth

Key:
Upside-down V: Rough side facing upward (structure lies horizontally)
Star symbol: Placement of eyes
To start, fold the black paper into V’s like this (yes, there are a lot of steps, but they’re easy, we promise!):

1. Take a piece of paper and fold it in half the long way.

2. From here on out, it’s important that the opening to this folded piece is facing down. Fold down the middle the short way to make a crease, then unfold.

3. Fold down half the piece at an angle (on both sides of the crease) so that the folded edge lines up to the crease in the middle. Be sure not to overlap these folds.

4. Flip the piece over.

5. Fold the bottom right corner up diagonally.

6. Repeat symmetrically on the other side. Be sure not to overlap onto the top half, otherwise the pockets won’t turn out properly.

7. Fold one bottom triangle upward.

8. Fold the other bottom triangle upward so the whole piece now looks like a triangle.

9. Fold across the middle. (Flaps should be on the inside of the triangle.) Ta-da! Your 3D origami piece is complete.

10. These are the “pockets” for constructing. This is where the “points” will be inserted.

11. This is the “smooth side” of a 3D origami piece. It’s shown by a in the diagrams for each project.

12. This is the “rough side” of a 3D origami piece. It’s shown by a V in the diagrams for each project.

Now, start constructing at the head of the Spider.
1. Your first row will have 3 pieces. Start by holding 2 black folded pieces next to each other with their points up and rough side facing you. With a third piece, hold it in the same direction and insert its pockets into the middle points of the first 2 pieces. This should join the first 2 pieces. Glue as you go.
2. You have 3 pieces attached to one another, which makes up part of row 1 and 2 of the diagram. To construct off of this, take another black folded piece and hold it right next to the 2 pieces from row 1. Use another black folded piece and insert it into row 2. This piece’s pockets will be inserted into the points of row 1, thus joining the pieces of that row. You should now have 3 pieces in row 1, and 2 pieces in row 2. Keep gluing!

3. Continue building and following the diagram. On all rows with 6 pieces across, the outer pieces must be inserted with the point into the inner pocket of that piece. This is so part of the folded piece will hang out from the body and you will have something to construct the legs off of.

4. Construct each leg by taking 3 folded pieces and inserting them directly into one another’s pockets (2 points of a piece will be inserted into the 2 pockets of another).
5. The legs will attach to the body at the 8 areas where the flaps are hanging out. Remember to glue!

6. Cut 2 small circles out of white paper and use a black marker to color a smaller circle in the middle. Hot glue the eyes to the structure.

7. Finally, cut the mouth out of yellow paper and hot glue it under the eyes.

9. He’s ready to crawl away!
Excerpted from 3D Origami Fun!: 25 Fantastic, Foldable Paper Projects by Stephanie Martyn. Copyright © F+W. Used by permission of the publisher. All rights reserved. Photography by Stephanie Martyn and Elisabeth Lariviere.


